Table of Contents
How to change display backlight intensity in HDMI modules ?
Introduction
This manual explains how to change the display backlight intenisty in different HDMI modules. Modules have different interfaces that alter the method of setting up them.
Types of modules classified by size.
Modules are divided into 5 groups: 5″, 7″, 10.1″, 12.1″ and 15.6”. The first three groups (5″, 7″, 10.1″) have 6 types of modules each, while the last two groups (12.1″ and 15.6″) have 5 types each.
Below is the list of 5” modules:
RVT50HQHNWN00
RVT50HQHFWN00
RVT50HQHNWCA0
RVT50HQHFWCA0
RVT50HQHNWC00
RVT50HQHNWC00-B
Below is the list of 7” modules:
RVT70HSHNWN00
RVT70HSHFWN00
RVT70HSHNWCA0
RVT70HSHFWCA0
RVT70HSHNCW00
RVT70HSHNWC00-B
Below is the list of 10.1” modules:
RVT101HVHNWN00
RVT101HVHFWN00
RVT101HVHNWCA0
RVT101HVHFWCA0
RVT101HVHNWC00
RVT101HVHNWC00-B
Below is the list of 12.1” modules:
RVT121HVHNWN00
RVT121HVHFWN00
RVT121HVHNWCA0-B
RVT121HVHFWCA0-B
RVT121HVHNWC00-B
Below is the list of 15.6” modules:
RVT156HKHNWN00
RVT156HKHFWN00
RVT156HKHNWCA0-B
RVT156HKHFWCA0-B
RVT156HKHNWC00-B
Changing the display backlight intensity
There are several ways to change the intensity of display backlight. First thing that needs to be done is delivering power supply to the module that can be achievied via connecting USB-C cable (5″, 7″), 6-pin molex connector labaled „PWM&POWER” or DC power jack. Next step is regarding to which module is being used, there is a different way to change the display backlight intensity.
Methods divided by module size
For 5” modules:
To change the display backlight intensity it is possible to do it by using only „POWER&PWM” 6-pin molex.
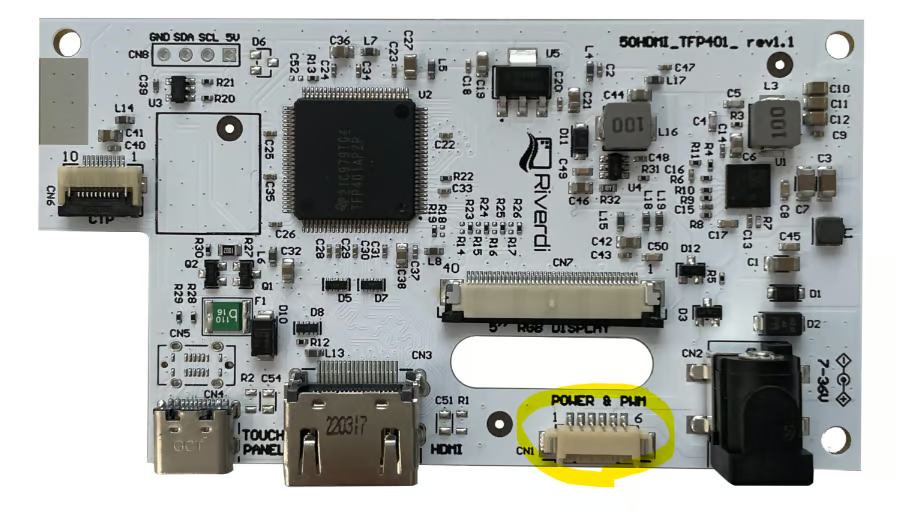

Figure 1. 5-inch module PCB overview
For 7” modules:
To change the display backlight intensity it is possible to do it by 5 methods:
– UART interface
– „POWER&PWM” 6-pin molex
– pushbuttons on PCB (PWR, MENU, EXIT, UP, DOWN)
– keyboard extension interface (works the same as pushbuttons on PCB)
– DDC control over HDMI (using this method, UART method is not possible)


Figure 2. 7-inch module PCB overview
For 10.1” and 12.1″ modules:
To change the display backlight intensity, it is possible to do it by 4 methods:
– „POWER&PWM” 6-pin molex
– pushbuttons on PCB (PWR, MENU, EXIT, UP, DOWN)
– keyboard extension interface (works the same as pushbuttons on PCB)
– DDC control over HDMI
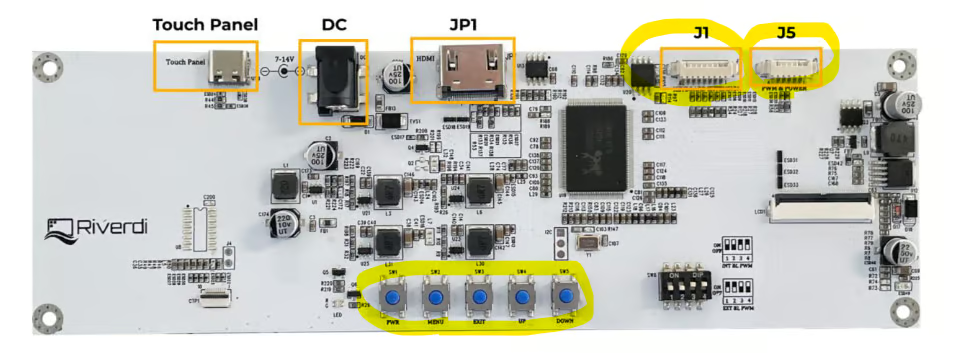

Figure 3. 10-inch module PCB overview (12-inch module board identical).
For 15.6” modules:
To change the display backlight intensity, it is possible to do it by 4 methods:
– „POWER&PWM” 6-pin molex
– pushbuttons on PCB (PWR, MENU, EXIT, UP, DOWN)
– keyboard extension interface (works the same as pushbuttons on PCB)
– DDC control over HDMI


Figure 4. 15.6-inch module PCB overview
Instruction
„Power&PWM” 6-pin molex
To change display backlight intensity using „Power&PWM” 6-pin molex use PWM signal generator.
Signal parameters:
f – 1k-10kHz
V – 3,3V
Range: 3.0-3.6V
UART interface
To change display backlight intensity using UART interface, first connect power supply to the module and HDMI. Next step is connecting the display via UART molex, after that using special tools, send UART command to the device responsible for changing the backlight intensity to the desired level.
Baud rate: 9600
5AA5038001xx, where xx can range from 0 to 64
Pushbuttons on PCB (PWR, MENU, EXIT, UP, DOWN)
To change display backlight intensity using pushbuttons on PCB, first connect power supply to the module and HDMI. Next step is using the PWR button, run the module. If the module is ON, press the menu button 3 times to access brightness control option. Using buttons UP and DOWN adjust the brightness to the desired level. Leave the menu using EXIT button 3 times.
Keyboard extension interface (works the same as pushbuttons on PCB)
To change display backlight intensity using Keyboard extension interface, first connect power supply to the module and HDMI. Next step is connecting the keyboard to the keyboard extension molex, after that using the PWR button, run the module. If the module is ON, press the menu button 3 times to access brightness control option. Using buttons UP and DOWN adjust the brightness to the desired level. Leave the menu using EXIT button 3 times.
To change display backlight intensity via DDC control over HDMI. There are two ways within this method depending what OS is used. For Windows OS user can use a software(i.e. Twinkie Tray) to control the backlight with a slider (Fig. 5), in case Linux OS is used, then the backlight level can be changed with DDC control commands shown below (Fig. 6).
ddccontrol -p
ddccontrol -r 0x10 -w 1 dev:/dev/i2c-21
ddccontrol -r 0x10 -w 50 dev:/dev/i2c-21
ddccontrol -r 0x10 -w 100 dev:/dev/i2c-21
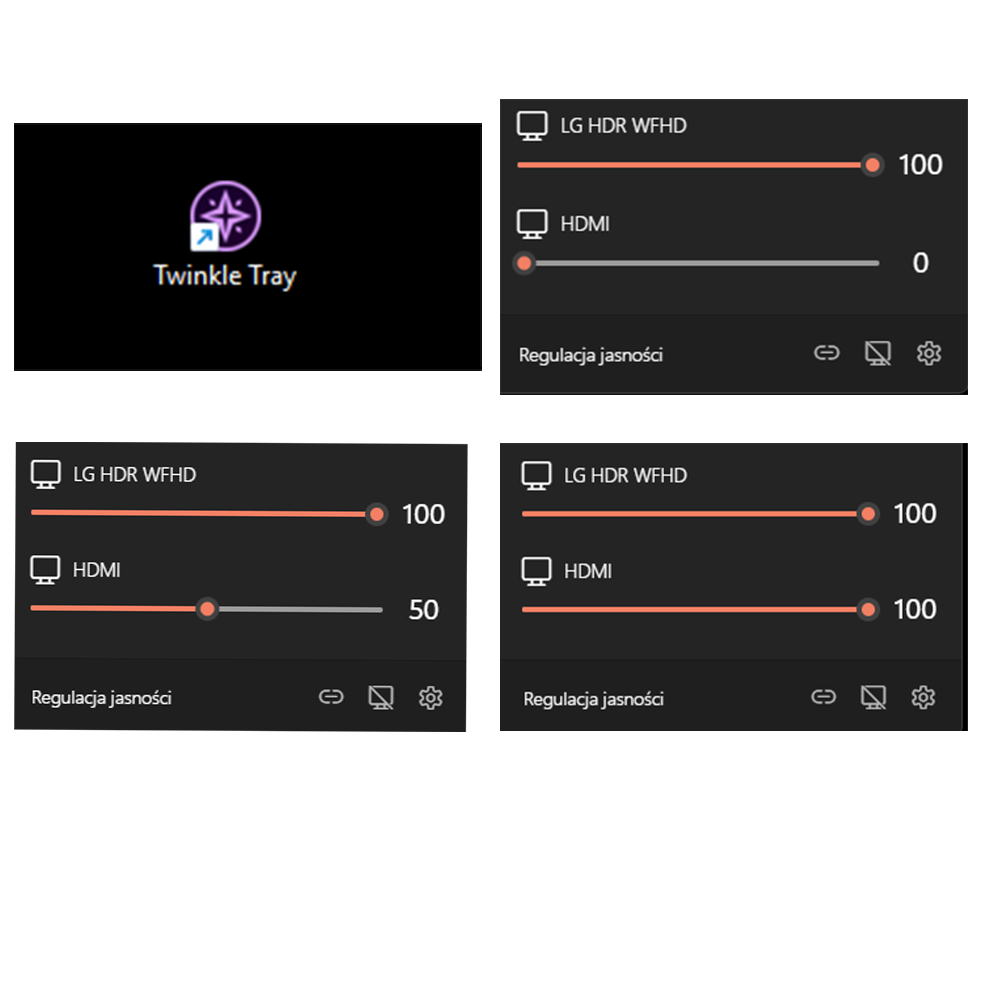

Figure 5. Twinkle Tray backlight control
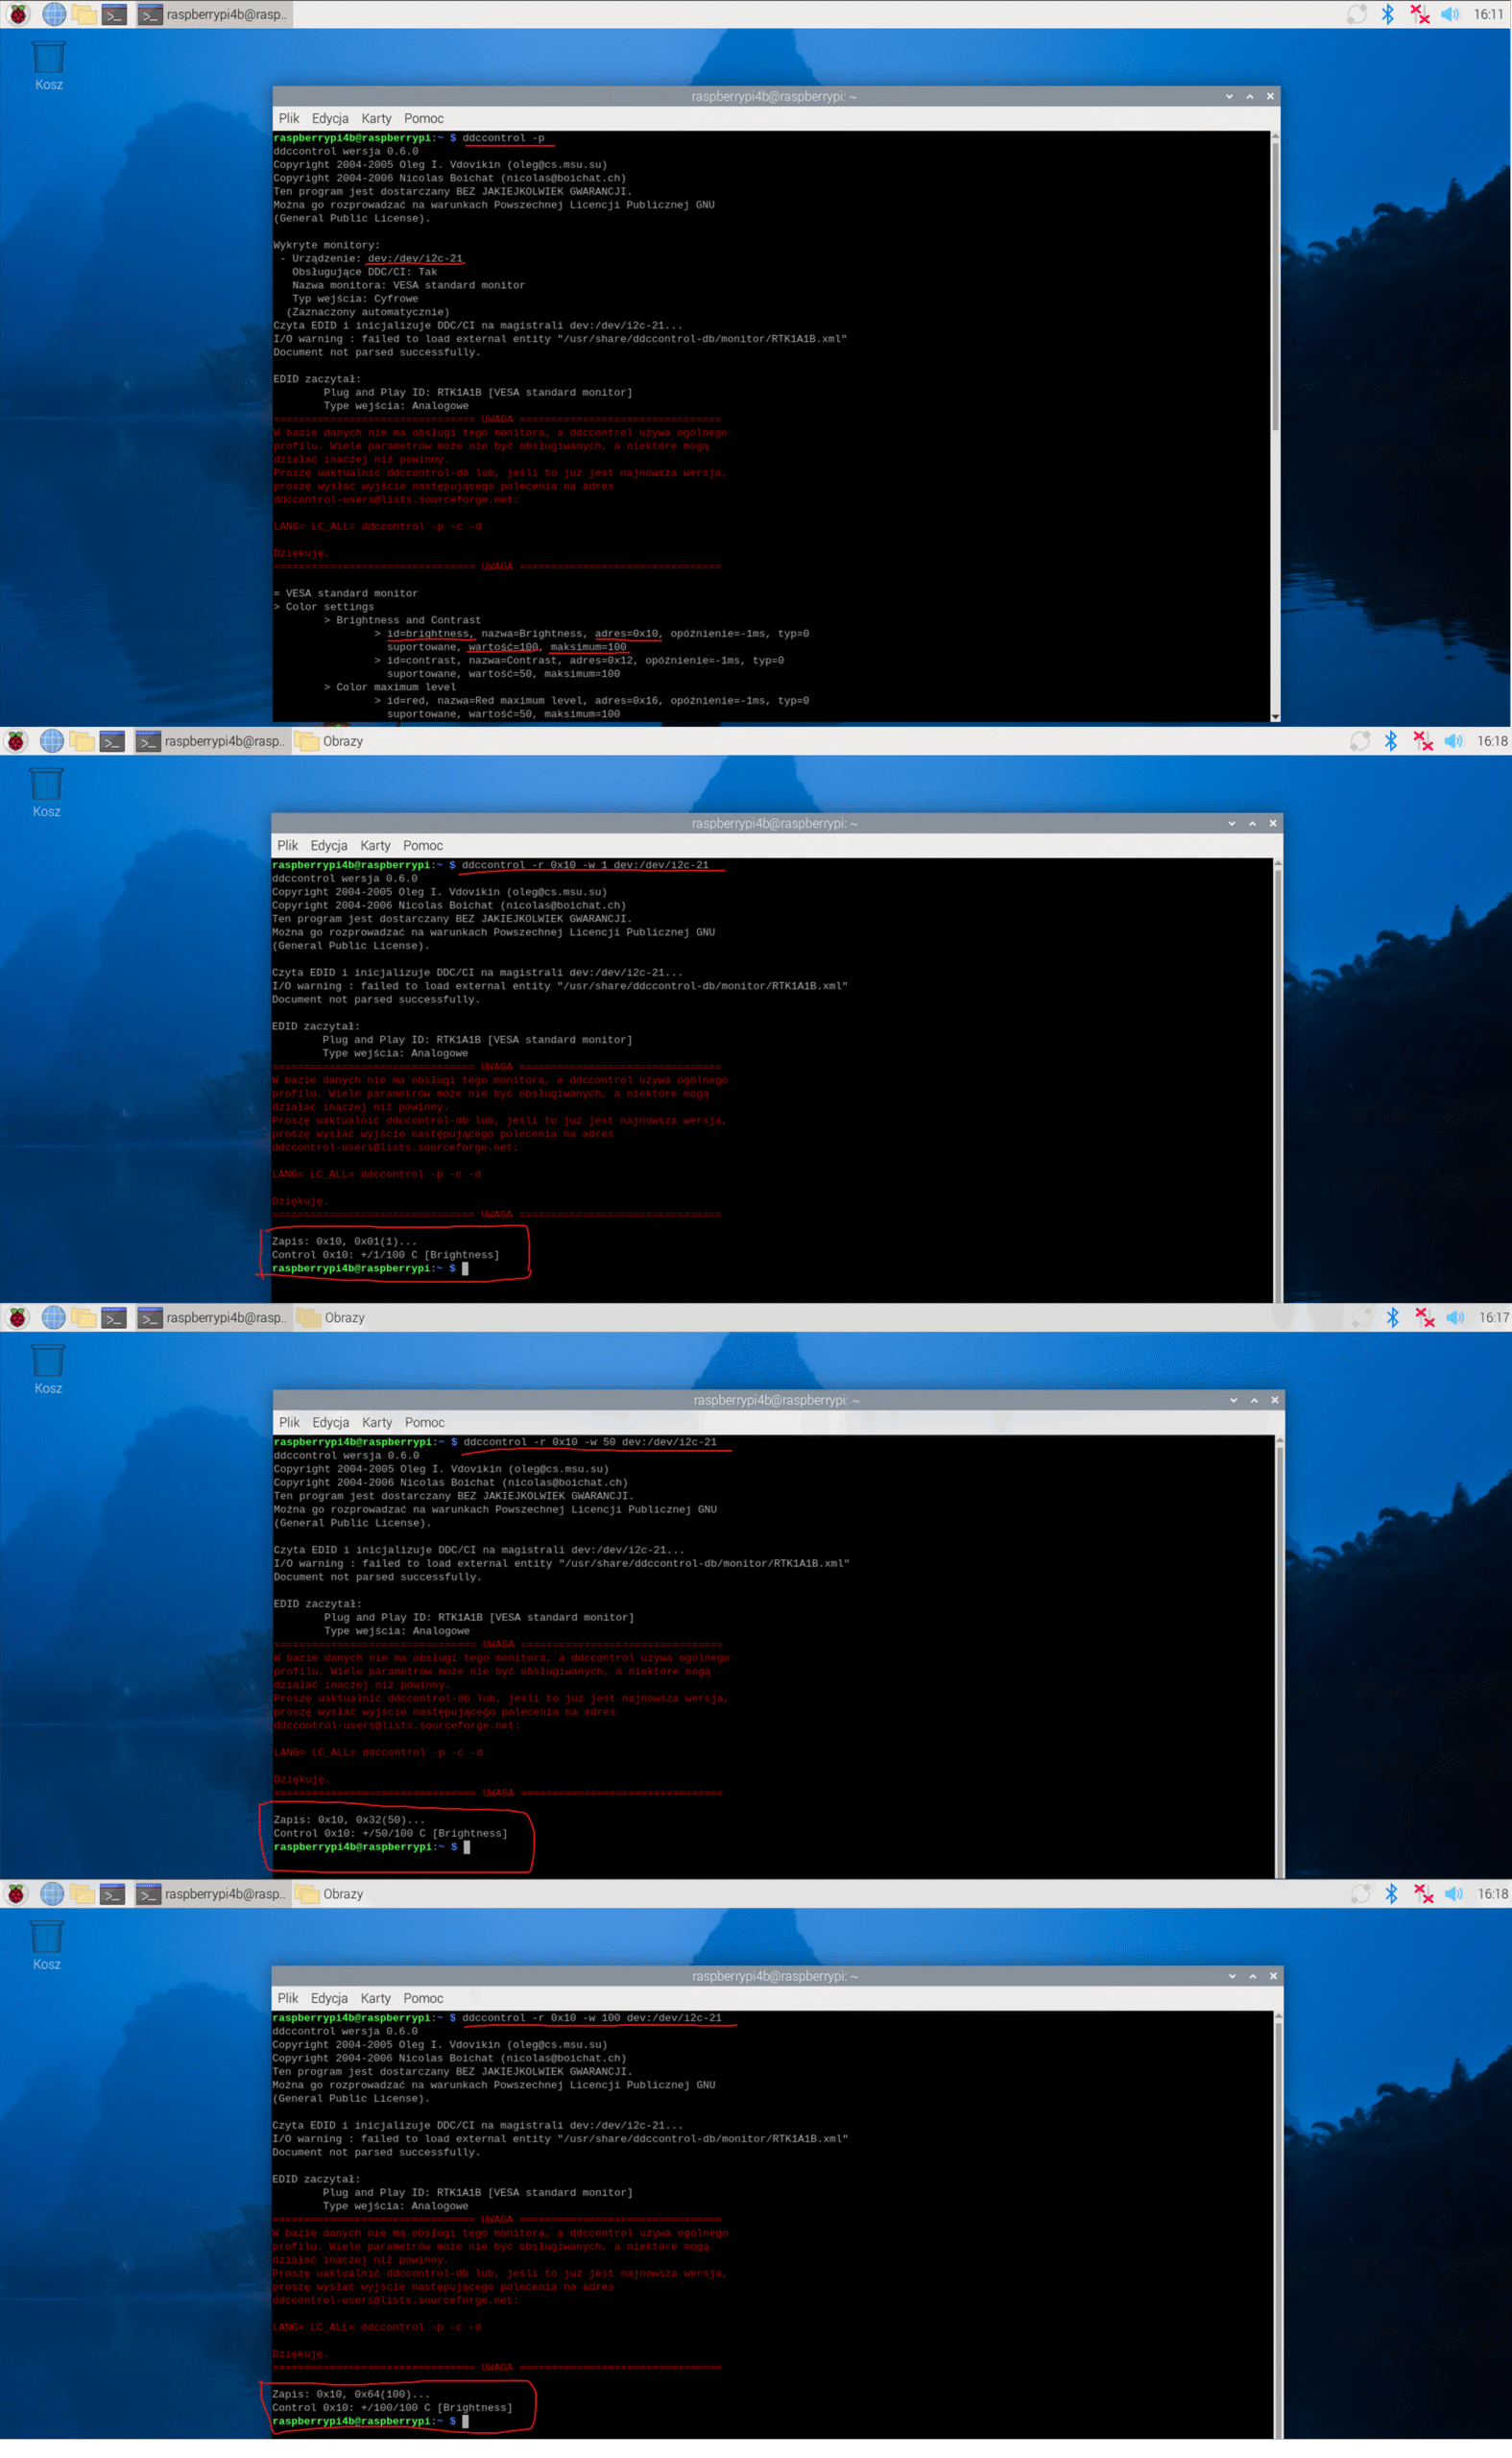

Figure 6. Linux commands ddccontrol
Summary
Depeneding on which type of module is being used there are several methods of setting up the display backlight intensity. Not all of the modules have the same interfaces, but all of them have one common which is 6-pin molex labeled „PWM&POWER”.
DISCOVER OUR
Whitepaper
Achieve the perfect user-display interaction with the right Touch Sensor IC. Ever faced issues with phantom touch events or certification? Boost your R&D like a pro with our Whitepaper!
