Table of Contents
How to use Flash memory with BT81x chips
To understand Embedded Video Engine (EVE) – BT81x, you have to remember that it doesn’t have typical solution, as it is in embedded systems with LCD screens. What does it mean?
EVE chips have no frame buffer – it means that all display operation are done at run time.
Using NOR flash memory, allows to store and display directly from it: pictures, audio and video. You can also use custom fonts stored in flash, prepared in EVE Asset Builder (described below).
BT81x has serial flash memory located at 80 0000h


Detecting memory, using STM32 Evaluation board in direct configuration (USB -> SPI bridge)
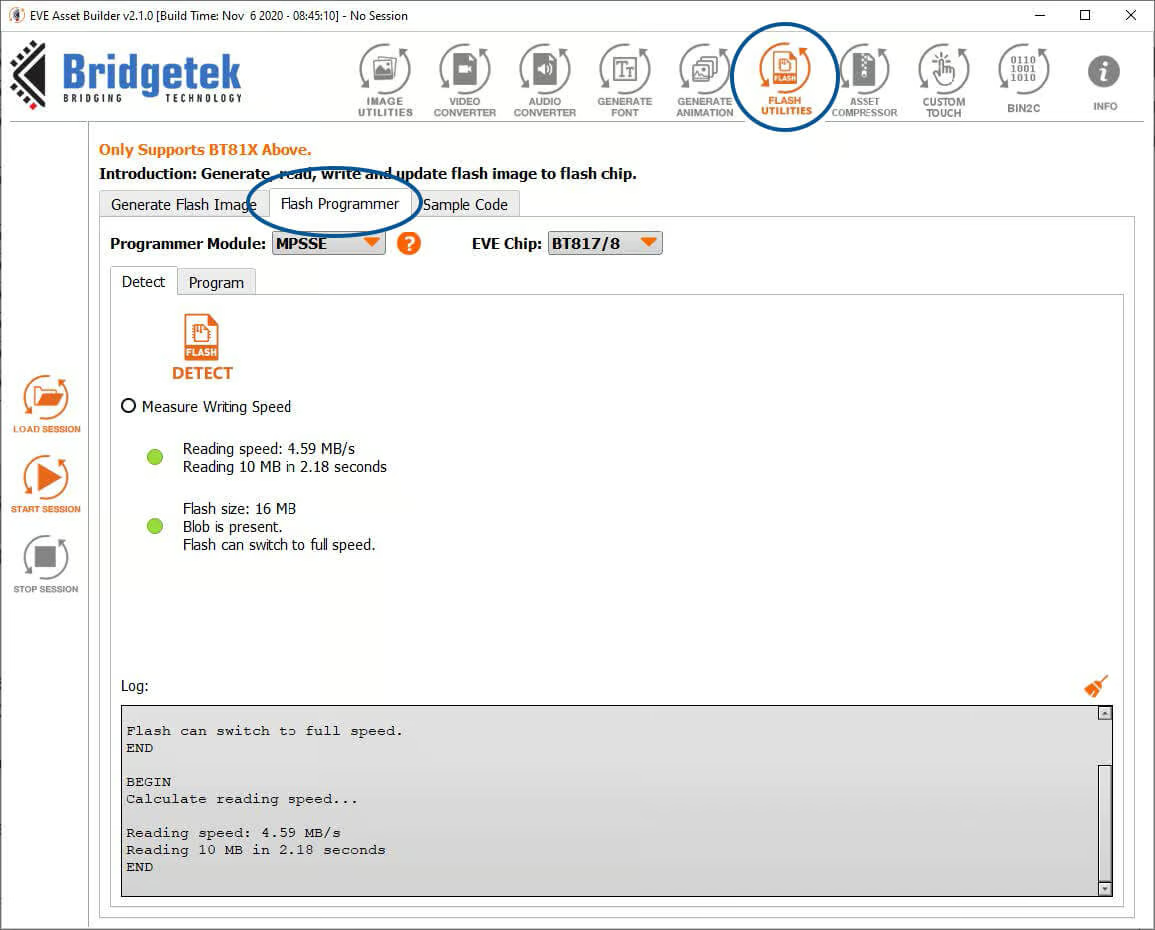

To support different vendors of SPI NOR flash chips, the first block (4096 bytes) of the flash is reserved for the flash driver called BLOB file which is provided by Bridgetek. The BLOB file shall be programmed first, so that flash state can enter into full-speed (fast) mode. The flash chip has correct blob file programmed in its first block (4096 bytes).
Creating flash Image file
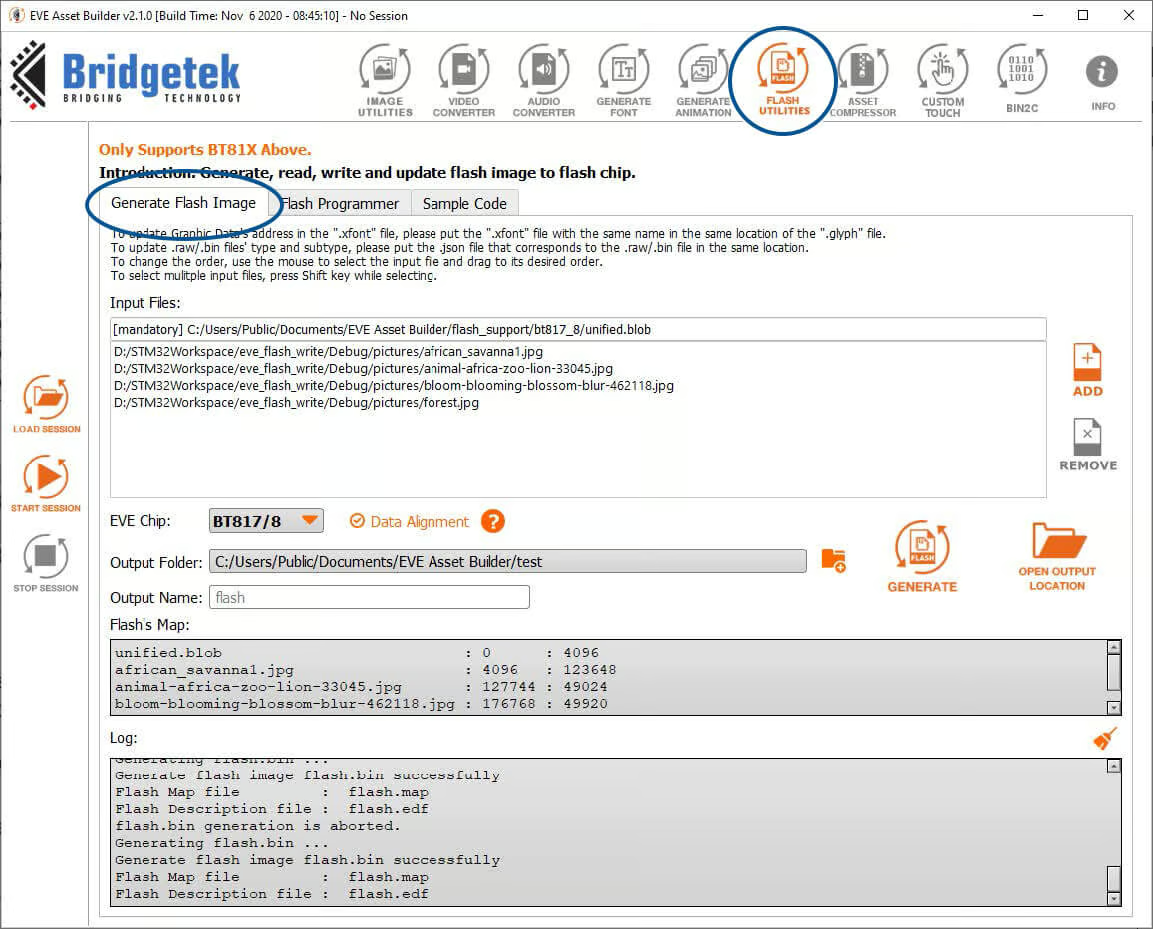

Generated file is *.bin file with flash data and *.map file with addresses and sizes of the file in memory.


Programming memory using STM32 Evaluation Board
Configuration of the STM32 Evaluation Board and LCD Module in direct mode:
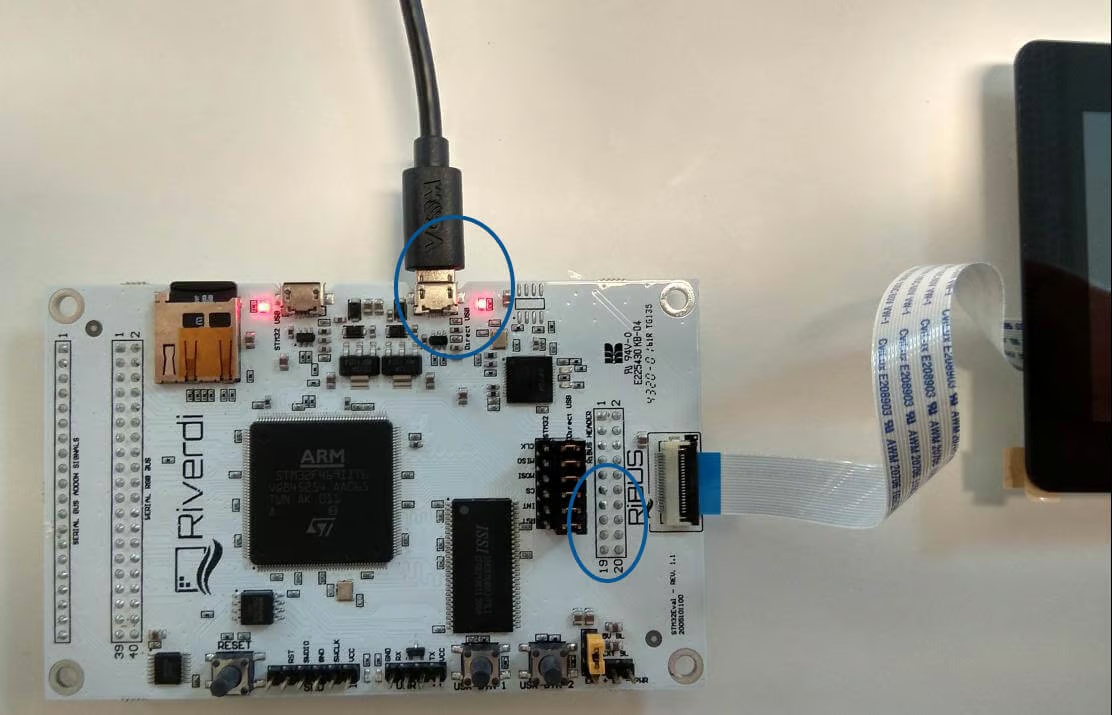

Please download drivers from : https://ftdichip.com/drivers/d2xx-drivers/
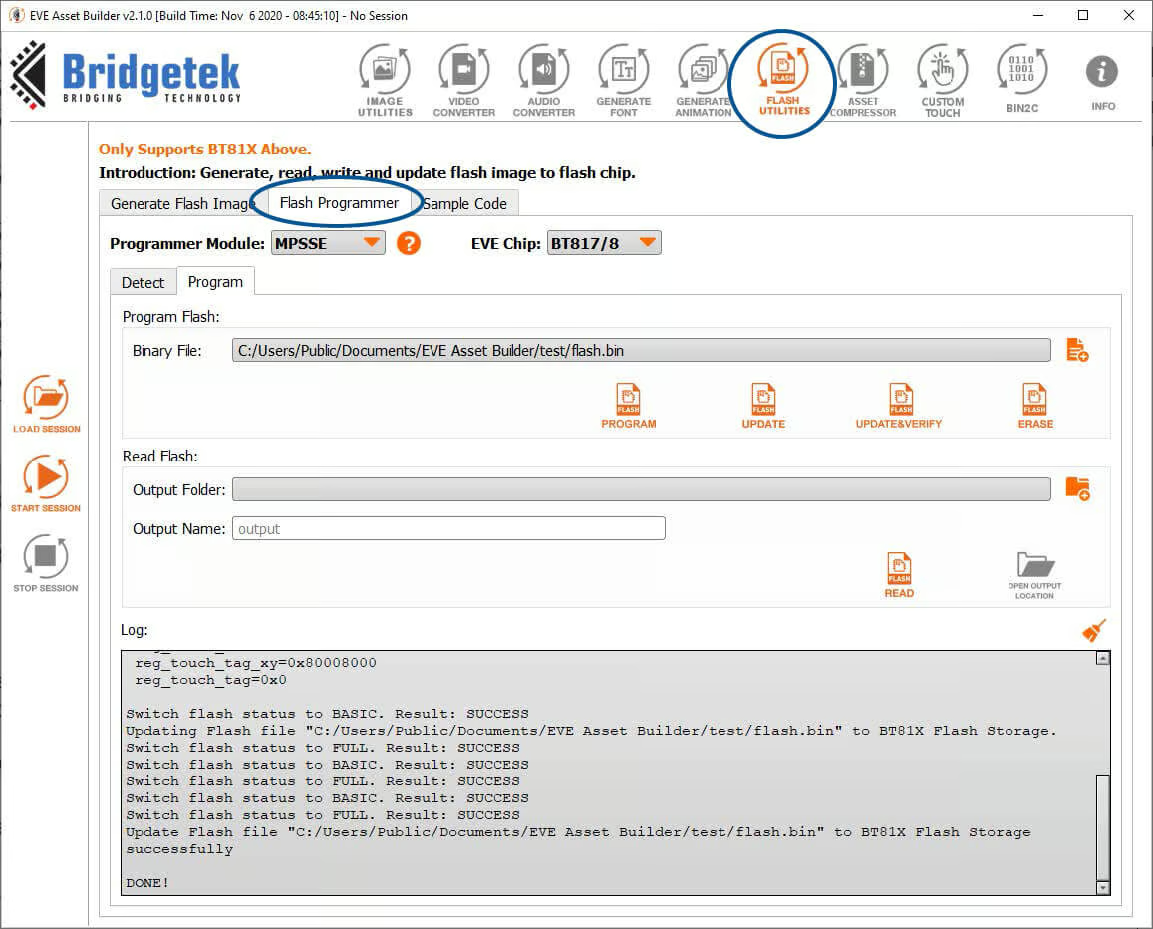

C Code examples for flash operations:
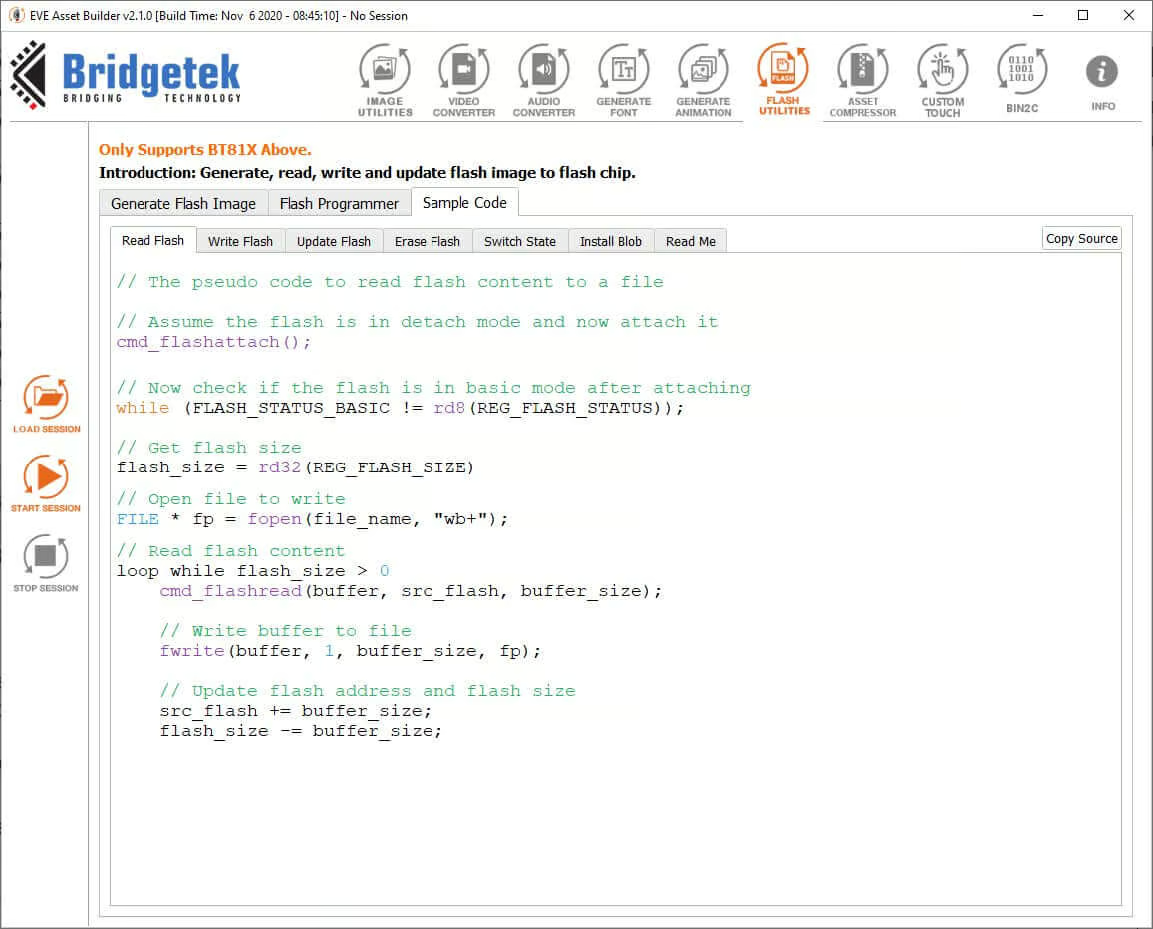

The code examples you can find on Riverdi GitHub: https://github.com/riverdi/EVE3_flash_write (please mind that same examples will work for EVE4 and EVE3 chips).
For other platforms just need to change file system managing functions such as fopen(), fread(), fclose().
Demo Example code uses FatFS library to read data from SD card and put it to EVE NOR flash memory.
Fonts: Legacy Format


Bitmap Format: Select All, or a combination of L1, L2, L4, L8
EVE Command support: Select command SETFONT or SETFONT2 to setup font file. RIVERDI MANUAL
- SETFONT: Generate FT80X compatible font metric table, the default option.
- SETFONT2: Generate BT81X/FT81X compatible font metric table for Cmd_SetFont2 command. The generated files with this option are not compatible with FT80X
Address of Font Data(Metrics Table + Glyph): Address to put font data in RAM_G
User Defined Character Set: If not selected (default), all characters in the font will be converted. If selected, only a list of characters in a text file would be converted, characters in this list must be defined in the input font file.
Printable ASCII Characters [32-126]: If selected, ASCII characters which have code point from 32 to 126 will be converted.
Output:
- Generate the metric block file as well as L1, L2, L4, L8 format bitmap data.
- The output is one 148 bytes metric block followed by the raw bitmap data.
- This tool also generates sample C code to demonstrate the usage.
- The output data is prepared for 1 bitmap handle.
uint8_t font[]=
{
/*Bitmap Raw Data end —*/
}
#define FONT_HANDLE (1)
#define FONT_FILE_ADDRESS (RAM_G + 1000)
#define FIRST_CHARACTER (32)
void Load_Font(uint32_t i)
{
Gpu_CoCmd_Dlstart(phost);
App_WrCoCmd_Buffer(phost, CLEAR(1, 1, 1));
App_WrCoCmd_Buffer(phost, COLOR_RGB(255, 255, 255));
Gpu_Hal_WrMem(phost, FONT_FILE_ADDRESS, font, sizeof(font));
//Gpu_Hal_LoadImageToMemory(phost, “path\\to\\digital-7_24_L8.raw”, FONT_FILE_ADDRESS, LOAD);
Gpu_CoCmd_SetFont2(phost, FONT_HANDLE, FONT_FILE_ADDRESS, FIRST_CHARACTER);
Gpu_CoCmd_Text(phost, 0, 0, FONT_HANDLE, OPT_FORMAT, “display %d “, i);
App_WrCoCmd_Buffer(phost, DISPLAY());
Gpu_CoCmd_Swap(phost);
App_Flush_Co_Buffer(phost);
Gpu_Hal_WaitCmdfifo_empty(phost);
}
How to use Extended custom font stored in flash memory
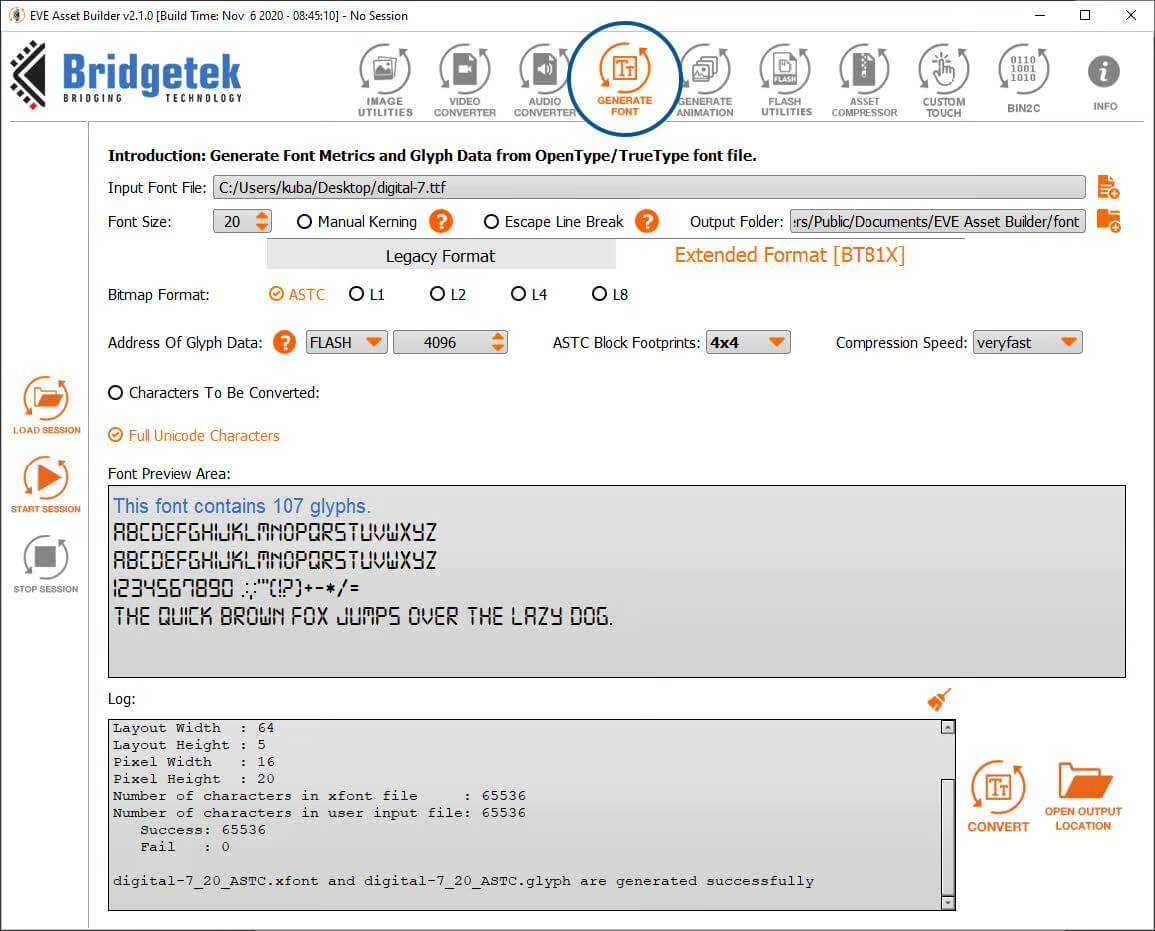
1. First what You have to do is generate glypth and xfont files from ttf font :

2. Generate image flash.bin file
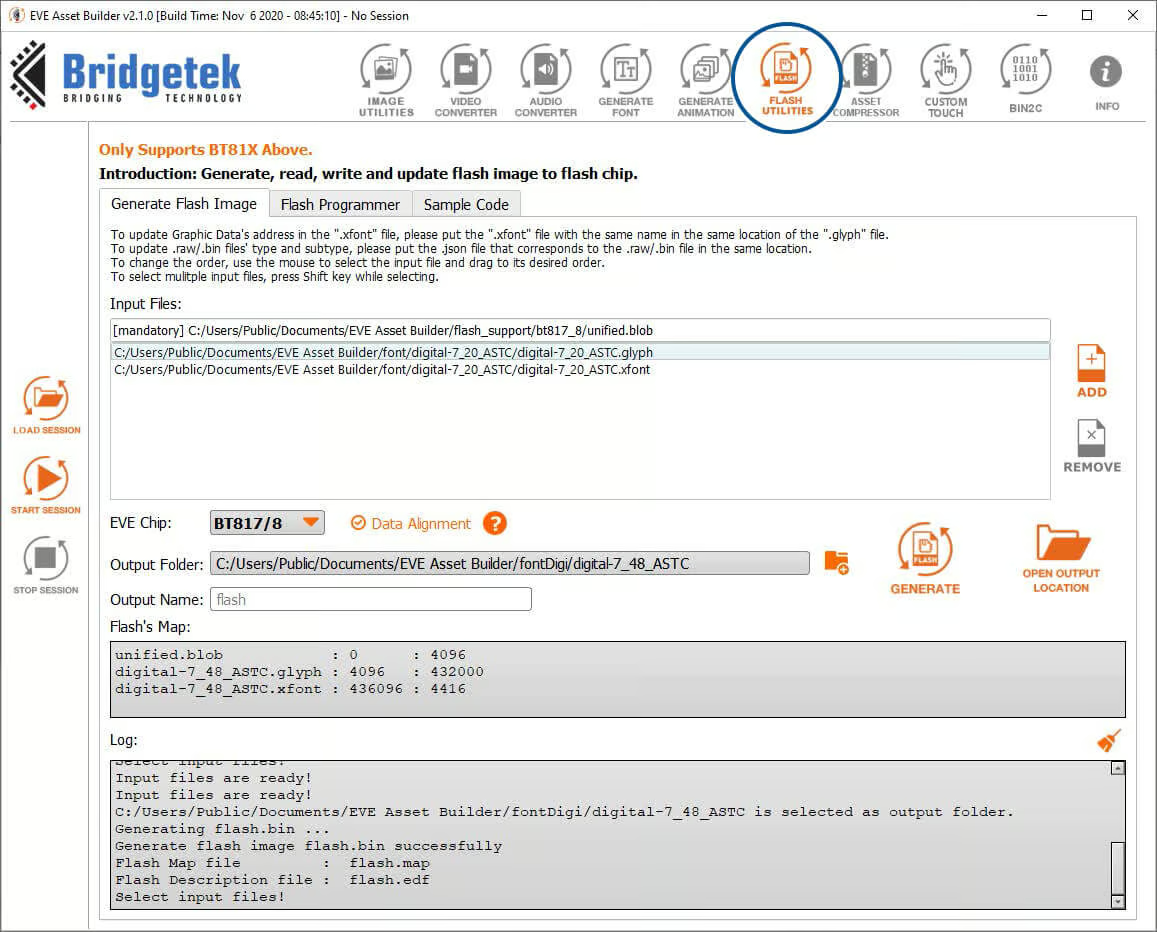

3. Program Flash (Update button), try to disconnect USB if You notice any problems
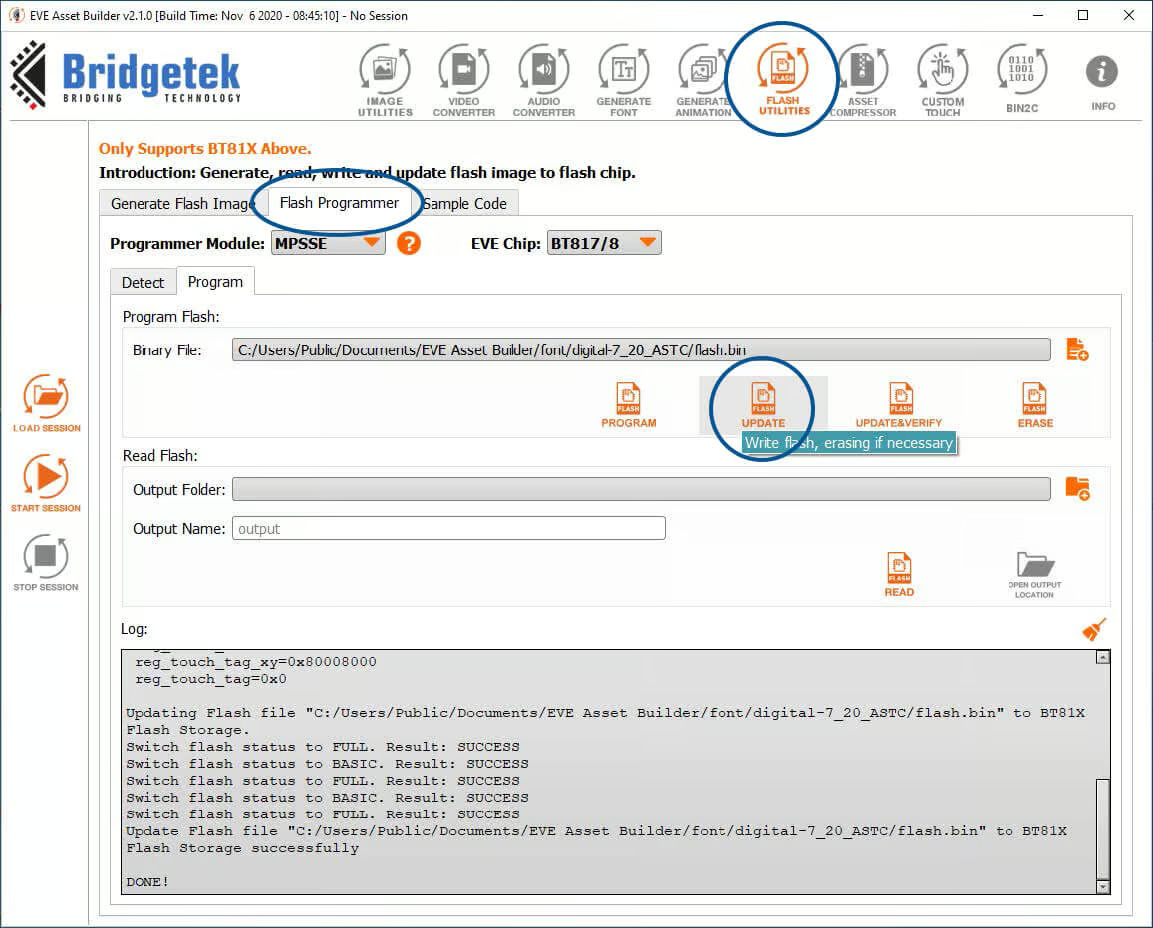

4. Code:
Font is in the flash memory (glypth file), You have to copy xfont to GRAM.


void Load_XFont(void)
{
uint32_t fontAddr = RAM_G;
// NOTE: Remember to write glyph file into BT815’s flash at address 4096
// Switch Flash to FULL Mode
Gpu_CoCmd_FlashFast(phost, 0);
// Load xfont file into graphics RAM
Gpu_CoCmd_FlashRead(phost, RAM_G, 52096, 4416);
Gpu_Hal_WaitCmdfifo_empty(phost);
Gpu_CoCmd_Dlstart(phost);
App_WrCoCmd_Buffer(phost, CLEAR(1, 1, 1));
App_WrCoCmd_Buffer(phost, COLOR_RGB(255, 255, 255));
Gpu_CoCmd_SetFont2(phost, 1, fontAddr, 0);
Gpu_CoCmd_Text(phost, 50, 50, 1, 0, u8“ABCDEFG 1234567890”);
App_WrCoCmd_Buffer(phost, DISPLAY());
Gpu_CoCmd_Swap(phost);
App_Flush_Co_Buffer(phost);
Gpu_Hal_WaitCmdfifo_empty(phost);
}
Images
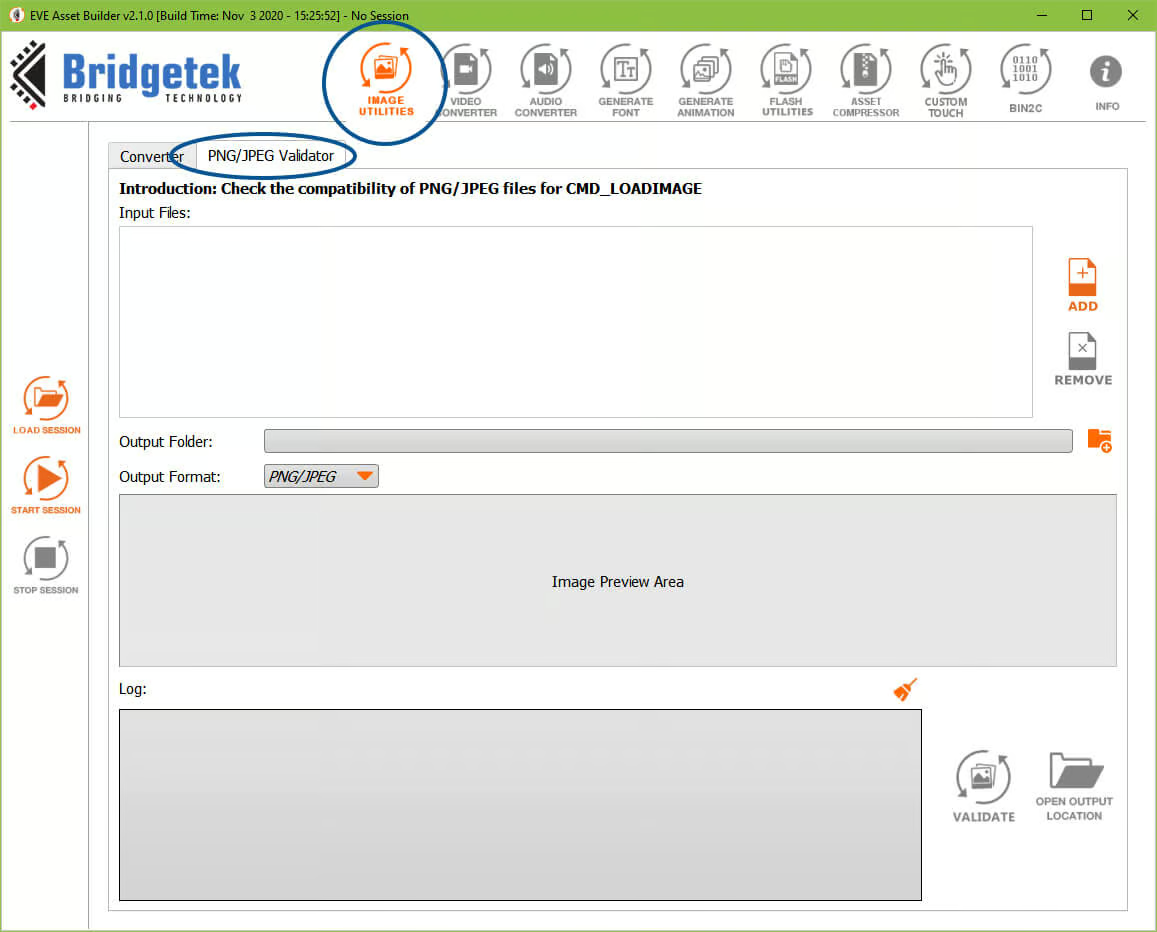

EVE accepts JPEG/PNG/BMP image files to be converted.
Output Format: Output format of images, it is one of the following:
ARGB1555, L1, L2, L4, L8, RGB232, ARGB2, ARGB4, RGB565, PALETTED565, PALETTED4444, PALETTED8, ASTC format from 4×4 to 12×12, DXT1ASTC format could be also used to play animations.
C code example to display JPEG file (JPEG file is decompressed to GRAM):
static void Load_Jpeg(Gpu_Hal_Context_t *phost, uint32_t adr)
{
Gpu_CoCmd_Dlstart(phost);
App_WrCoCmd_Buffer(phost, CLEAR(1, 1, 1));
App_WrCoCmd_Buffer(phost, COLOR_RGB(255, 255, 255));
//Gpu_CoCmd_FlashHelper_SwitchFullMode(&host);
Gpu_CoCmd_FlashSource(phost, adr);
Gpu_CoCmd_LoadImage(phost, 0, OPT_FLASH );
//Start drawing bitmap
App_WrCoCmd_Buffer(phost, BEGIN(BITMAPS));
App_WrCoCmd_Buffer(phost, VERTEX2II(0, 0, 0, 0));
App_WrCoCmd_Buffer(phost, END());
App_WrCoCmd_Buffer(phost, RESTORE_CONTEXT());
App_WrCoCmd_Buffer(phost, DISPLAY());
Gpu_CoCmd_Swap(phost);
App_Flush_Co_Buffer(phost);
Gpu_Hal_WaitCmdfifo_empty(phost);
//platform_sleep_ms(3000);
}
ASTC picture directly displayed from flash memory:
static void Load_ImageASTC(Gpu_Hal_Context_t *phost, uint32_t adr, uint16_t fmt)
{
uint16_t iw = 1280;
uint16_t ih = 800;
Gpu_CoCmd_Dlstart(phost);
//App_WrCoCmd_Buffer(phost, CLEAR(1, 1, 1));
//App_WrCoCmd_Buffer(phost, COLOR_RGB(255, 255, 255));
//Gpu_CoCmd_FlashSource(phost, adr);
Gpu_CoCmd_SetBitmap(phost, (0x800000 | adr/ 32 ), fmt, iw, ih);
//Gpu_CoCmd_SetBitmap(phost, RAM_G,RGB565 , iw, ih);
//Start drawing bitmap
App_WrCoCmd_Buffer(phost, BEGIN(BITMAPS));
App_WrCoCmd_Buffer(phost, VERTEX2F(0, 0));
App_WrCoCmd_Buffer(phost, END());
App_WrCoCmd_Buffer(phost, RESTORE_CONTEXT());
App_WrCoCmd_Buffer(phost, DISPLAY());
Gpu_CoCmd_Swap(phost);
App_Flush_Co_Buffer(phost);
Gpu_Hal_WaitCmdfifo_empty(phost);
}
Video from Flash Memory
Video file has to be converted to *.avi in MJEG format.
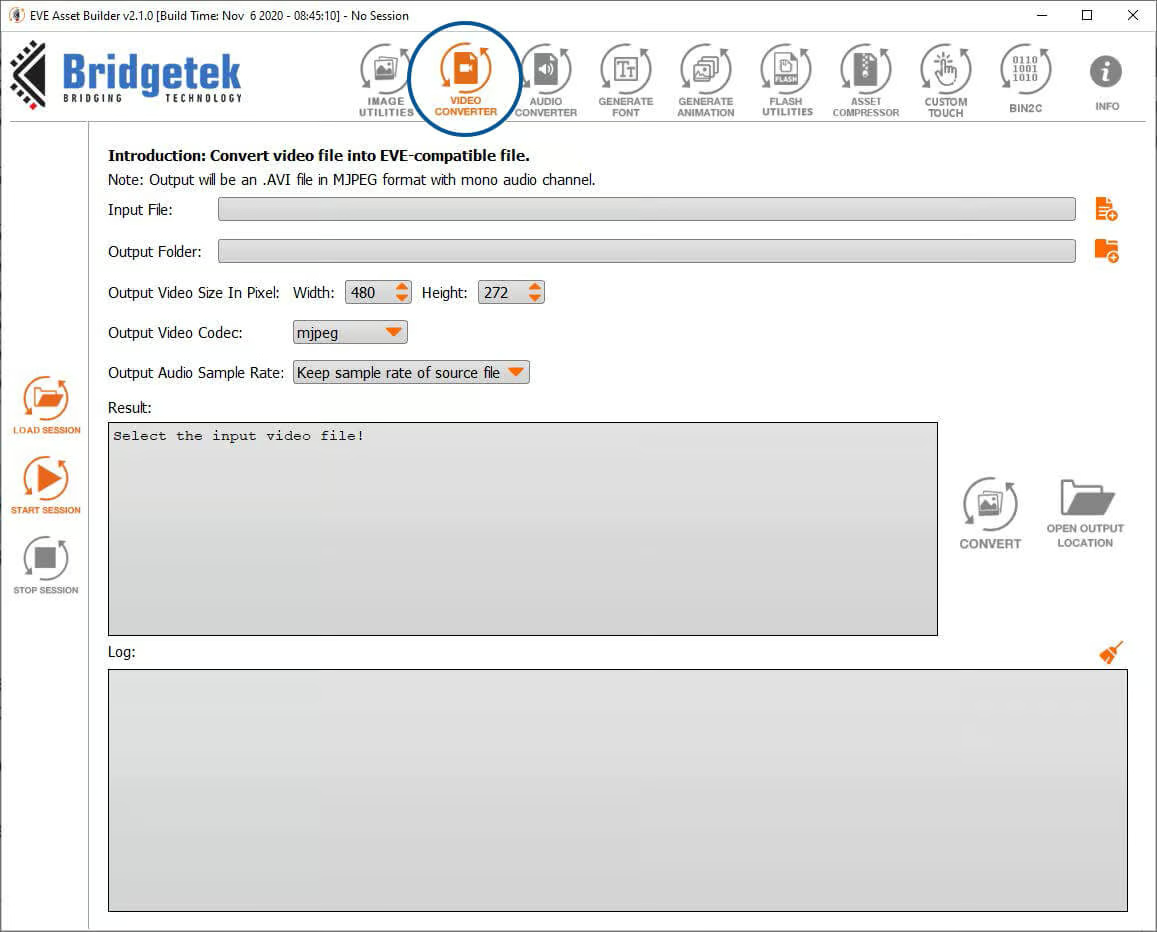

Code to run video from flash memory:
Gpu_CoCmd_FlashHelper_SwitchFullMode(&host);
Gpu_Hal_Wr32(phost, REG_PLAY_CONTROL, 1);
Gpu_CoCmd_Dlstart(phost);
App_WrCoCmd_Buffer(phost, CLEAR(1, 1, 1));
App_WrCoCmd_Buffer(phost, COLOR_RGB(255, 255, 255));
Gpu_CoCmd_FlashSource(phost, adr);
App_WrCoCmd_Buffer(phost, CMD_PLAYVIDEO);
App_WrCoCmd_Buffer(phost, OPT_FLASH|OPT_FULLSCREEN|OPT_NOTEAR);
App_Flush_Co_Buffer(phost);
Gpu_Hal_WaitCmdfifo_empty(phost);
Audio
Convert WAV/MP3 into EVE-compatible file.
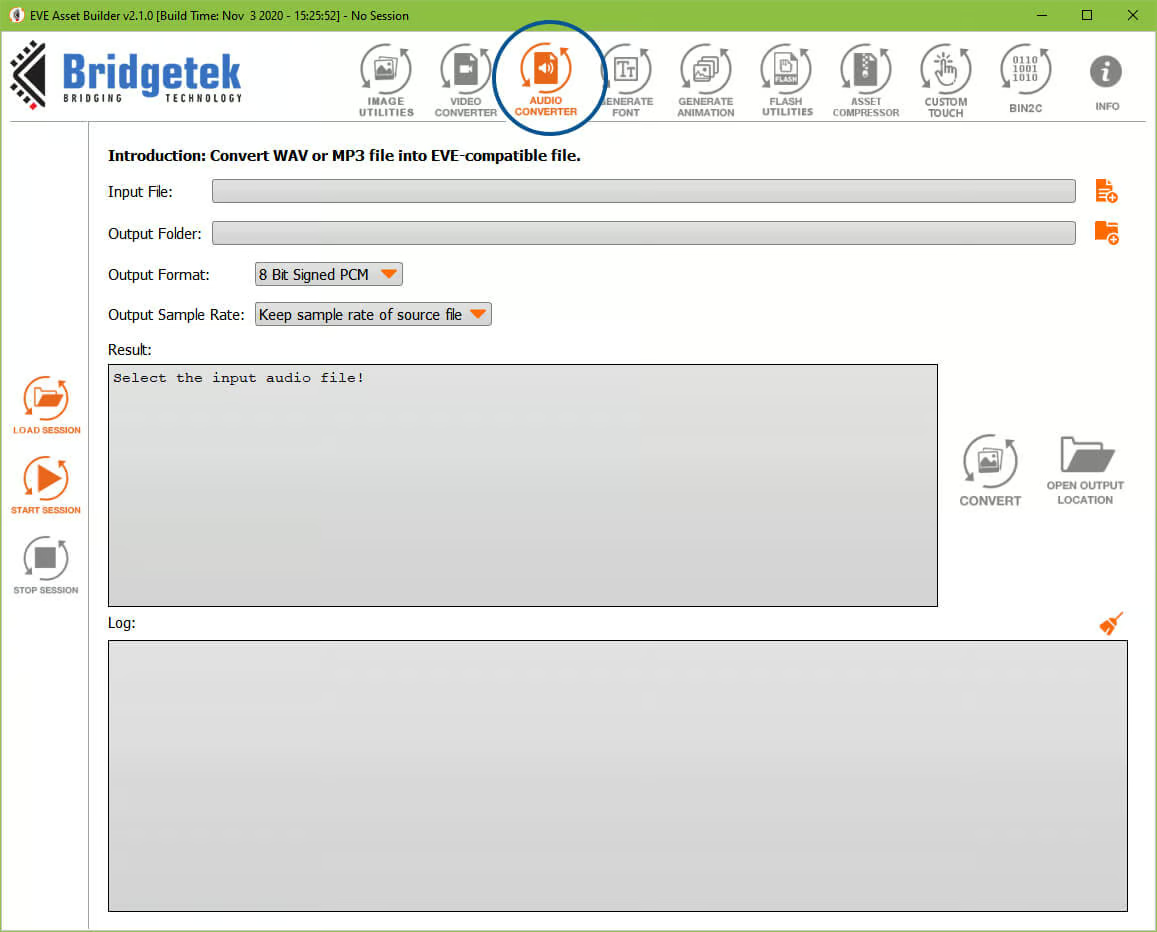

Input File: The original audio file to be converted.
Output folder: Folder contains converted files.
Output format: Audio format of the output
- 8 bit signed PCM
- 8 bit u-Law
- 4 bit IMA ADPCM
Generate Animation
Convert GIF file or a list of PNG/JPEG/BMP files into EVE compatible animation file. Animation is supported by BT81X chip and above.
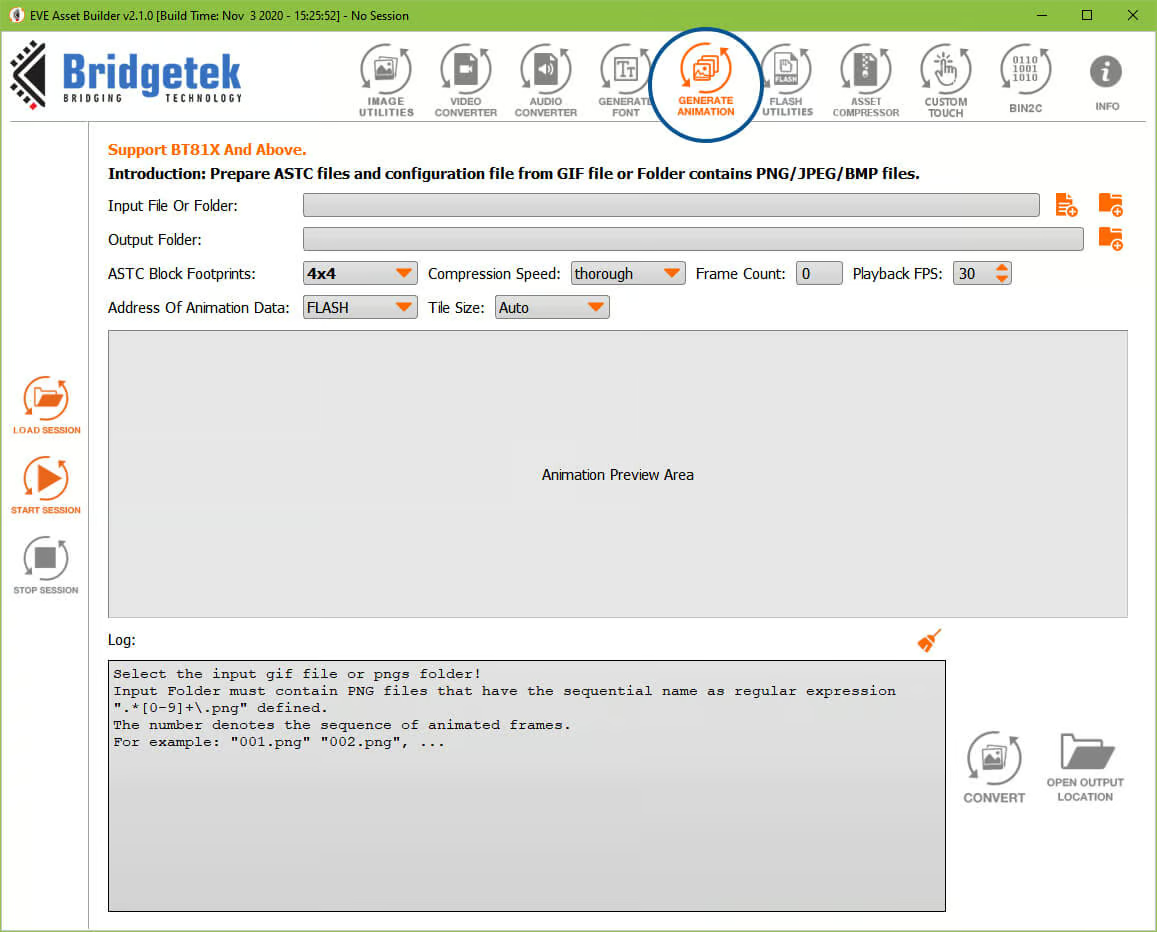

Input File Or Folder: Users can select GIF file or image folder. Image folder must contain PNG/JPEG/BMP files which have the sequential name as regular expression “.*[0- 9]+\.(png|jpeg|jpg|bmp)” defined. The number denotes the sequence of animated frames. For example: “001.png”, “002.png”.
Output Folder: Folder contains converted files.
ASTC Block Footprints: Select one of following: 4×4, 5×4, 5×5, 6×5, 6×6, 8×5, 8×6, 8×8, 10×5, 10×6, 10×8, 10×10, 12×10, 12×12
Compression Speed: veryfast, fast, medium, thorough and exhaustive. Quality increases from veryfast to exhaustive while encoding speed decreases as well.
DISCOVER OUR
Whitepaper
Achieve the perfect user-display interaction with the right Touch Sensor IC. Ever faced issues with phantom touch events or certification? Boost your R&D like a pro with our Whitepaper!
