How to run LVGL on Riverdi EVE display
Running a modern GUI on a microcontroller usually means dealing with framebuffers, memory limits, and performance trade-offs.
With EVE from our partner Bridgetek, rendering HQ HMI graphics, audio, and touch managing moves to the GPU. At the same time, LVGL, also a Riverdi partner, provides a flexible and widely used UI framework.
The effect: with this setup you build complex interfaces without pushing the MCU to its limits and it allows low-cost processors to drive advanced, professional-looking color displays with only minimal load
This guide explains how to run LVGL on a Riverdi EVE4 intelligent display using the Riverdi Evaluation Board based on STM32F4.
The example uses the Riverdi RVT70HSBNWC00-B 7-inch display connected through SPI via the RiBUS interface.
The goal of this tutorial is to demonstrate how to:
- initialize LVGL on the host MCU
- connect LVGL with the EVE graphics engine
- render LVGL widgets on the display
- enable touch interaction
Unlike traditional embedded displays, the EVE architecture does not require the host MCU to render a full framebuffer. Instead, the host sends drawing commands to the EVE GPU, which renders the final image.
This significantly reduces memory usage and CPU load on the MCU.
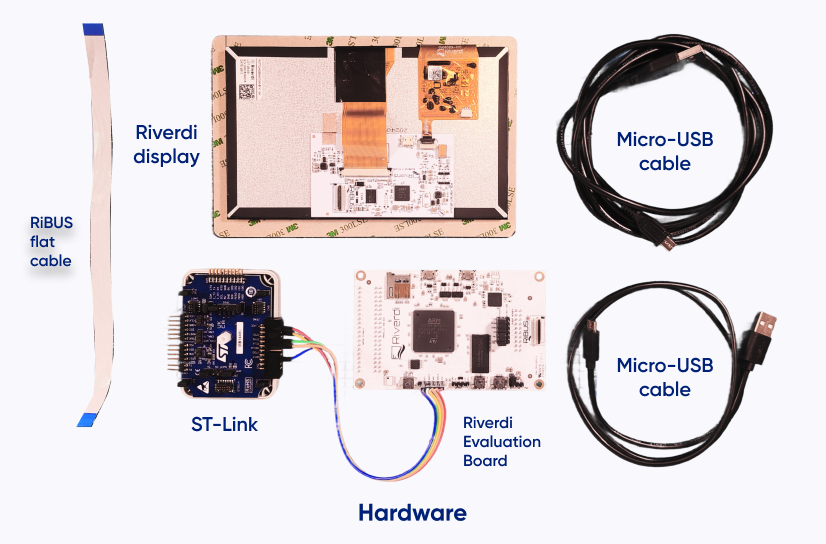
Hardware used
In this tutorial we use EVE4 (BT817Q). According to LVGL documentation, this should also work on other EVE versions, but it has not been tested yet.
The following hardware components are used in this tutorial.
Riverdi RVT70HSBNWC00-B
- 7” EVE4 intelligent display
- Resolution: 1280 × 600
- Integrated BT817Q graphics engine
- Projected capacitive touch
Riverdi Evaluation Board
- STM32F4 microcontroller
ST-Link
- used for programming and debugging
RiBUS flat cable
- used for SPI communication between the host and the EVE module
Micro-USB cables
- one for ST-Link
- one to power the evaluation board
Software requirements
Before starting the integration process, several software components need to be prepared. The project is built using STM32CubeIDE as the development environment, with LVGL providing the graphical user interface framework. Communication with the EVE graphics engine is handled through the Riverdi EVE support libraries, which implement the low-level interface between the host MCU and the BT817 GPU.
In this setup, LVGL does not render pixels directly into a framebuffer. Instead, LVGL drawing operations are translated into EVE commands that are sent to the GPU over SPI. The EVE device then executes these commands to render the final frame on the display.
The following software tools are required:
STM32CubeIDE (or other IDE)
- development environment for STM32 projects
- used to configure peripherals, build the project, and program the MCU
LVGL graphics library
- embedded GUI framework used to create the user interface
- provides widgets, layout system, and event handling
Riverdi EVE support libraries
- provide low-level communication with the EVE GPU]
- handle SPI transactions and command FIFO access
Git
- used to download repositories and example projects
To find the project, please visit Riverdi Github and look for EVE-LVGL repository.
Understanding the EVE rendering architecture
A key difference between EVE displays and traditional embedded displays is the way frames are generated. In most embedded systems the MCU renders pixels into a framebuffer, which is then continuously read by the display controller to refresh the screen
EVE devices follow a different approach. Instead of sending a framebuffer, the host MCU sends drawing commands to the GPU. These commands describe what should be drawn on the screen, while the EVE graphics engine generates the final pixels internally.
This significantly reduces memory usage and bandwidth requirements on the MCU.
The rendered frame is defined by a structure called the Display List. The Display List is a sequence of GPU commands executed every frame to generate the final image.
A simplified display pipeline therefore looks like this:
MCU → drawing commands → EVE GPU → LCD panel
This command-based architecture is the reason why complex graphical interfaces can run on relatively small microcontrollers.
Key EVE memory blocks
Internally, the EVE GPU uses several memory areas to process graphics commands.
RAM_DL
- stores the Display List used to render the current frame
RAM_G
- general-purpose graphics memory used for images, fonts, and other assets
Command FIFO
- buffer used by the co-processor to receive commands from the MCU
The host MCU writes commands into the command FIFO. The EVE co-processor interprets these commands and builds the Display List stored in RAM_DL. During the display refresh cycle, the GPU executes the Display List and generates the final frame.
How LVGL fits into the pipeline
When LVGL is used with traditional displays, it renders pixels into a framebuffer in MCU memory. With EVE displays the process is different.
LVGL draw operations are translated into EVE GPU commands, which are sent to the device over SPI. The GPU then builds the Display List and renders the frame internally.
The resulting flow looks like this:
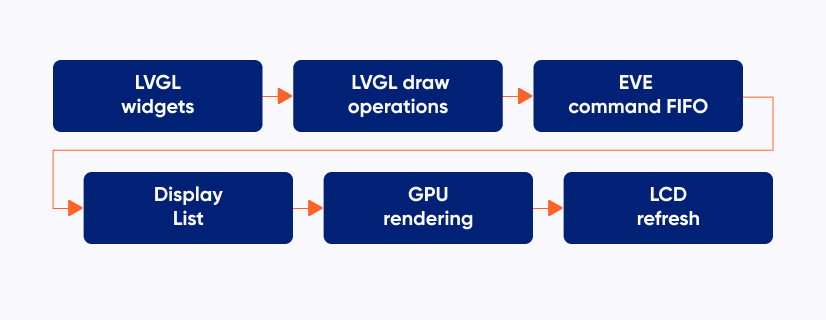
This allows LVGL to run complex user interfaces while keeping MCU memory usage very low.
Creating the STM32 project
The next step is preparing the development project for the Riverdi Evaluation Board. The host MCU will run the LVGL framework and communicate with the EVE GPU using SPI.
Start by creating a new STM32 project in STM32CubeIDE for the microcontroller used on the evaluation board. Once the project is created, configure the peripherals required to communicate with the EVE device.
The most important interface is SPI, which is used to transmit commands and data between the MCU and the EVE graphics controller.
In addition to SPI, several control signals must be configured as GPIO pins. These signals are used to control the power state of the EVE device and manage communication with the GPU.
Typical signals required by the EVE interface include:
CS
- chip select signal for SPI communication
PD
- power-down control pin used to reset or power-cycle the EVE device
INT
- interrupt line used by the GPU to signal events to the host MCU
Once the SPI interface and GPIO signals are configured, the project can be compiled and flashed to the board to verify that the basic hardware configuration works.
Initializing LVGL and the EVE display driver
After the project environment is ready, the LVGL library must be initialized. This step prepares the internal LVGL structures and enables the graphics framework.
lv_init();
LVGL provides a dedicated display driver for EVE GPUs. This driver translates LVGL drawing operations into commands understood by the EVE graphics engine.
The display driver is created using the lv_draw_eve_display_create() function.
lv_display_t * disp = lv_draw_eve_display_create(
        1280,
        600,
        LV_DISPLAY_RENDER_MODE_DIRECT
);
The parameters define the resolution of the display. In this example we use the 1280×600 resolution of the Riverdi RVT70HSBNWC00-B display.
Enabling Touch Input
The Riverdi EVE display includes an integrated capacitive touch controller that can be accessed through the EVE GPU interface.
LVGL provides a helper function that creates an input device driver connected to the EVE touch engine.
lv_draw_eve_touch_create(disp);
Once this function is called, touch coordinates detected by the EVE controller are automatically passed to LVGL and translated into input events.
This allows LVGL widgets such as buttons, sliders, and lists to react to user interaction.
Running the First LVGL Demo
After the display and input drivers are initialized, the system is ready to render the first graphical interface.
A simple way to verify the integration is to create a screen with several standard LVGL widgets. You can find demo code below:
static void create_test_ui(void)
{
    lv_obj_t * scr = lv_screen_active();

    /* Background */
    lv_obj_set_style_bg_color(scr, COLOR_BG, 0);
    lv_obj_set_style_bg_opa(scr, LV_OPA_COVER, 0);

    /* Title */
    lv_obj_t * title = lv_label_create(scr);
    lv_label_set_text(title, "LVGL on Riverdi EVE");
    lv_obj_set_style_text_font(title, &lv_font_montserrat_44, 0);
    lv_obj_set_style_text_color(title, COLOR_TEXT, 0);
    lv_obj_align(title, LV_ALIGN_TOP_MID, 0, 48);

    /* Subtitle */
    lv_obj_t * subtitle = lv_label_create(scr);
    lv_label_set_text(subtitle, "Basic widget compatibility test");
    lv_obj_set_style_text_font(subtitle, &lv_font_montserrat_24, 0);
    lv_obj_set_style_text_color(subtitle, COLOR_TEXT, 0);
    lv_obj_align(subtitle, LV_ALIGN_TOP_MID, 0, 100);

    /* --- layout anchors --- */
    int start_y = 170;
    int col_left = 180;
    int col_right = 640;

    /* Button */
    lv_obj_t * btn = lv_button_create(scr);
    lv_obj_set_size(btn, 200, 60);
    lv_obj_align(btn, LV_ALIGN_TOP_LEFT, col_left, start_y);
    lv_obj_set_style_bg_color(btn, COLOR_ACCENT, 0);

    lv_obj_t * btn_label = lv_label_create(btn);
    lv_label_set_text(btn_label, "Button");
    lv_obj_center(btn_label);

    /* Slider */
    lv_obj_t * slider = lv_slider_create(scr);
    lv_obj_set_width(slider, 260);
    lv_obj_align(slider, LV_ALIGN_TOP_LEFT, col_right, start_y + 15);
    lv_slider_set_value(slider, 45, LV_ANIM_OFF);

    lv_obj_set_style_bg_color(slider, COLOR_WIDGET, LV_PART_MAIN);
    lv_obj_set_style_bg_color(slider, COLOR_ACCENT, LV_PART_INDICATOR);

    /* Switch */
    lv_obj_t * sw = lv_switch_create(scr);
    lv_obj_align(sw, LV_ALIGN_TOP_LEFT, col_left, start_y + 120);

    lv_obj_t * sw_label = lv_label_create(scr);
    lv_label_set_text(sw_label, "Switch");
    lv_obj_set_style_text_color(sw_label, COLOR_TEXT, 0);
    lv_obj_align_to(sw_label, sw, LV_ALIGN_OUT_RIGHT_MID, 20, 0);

    /* Checkbox */
    lv_obj_t * cb = lv_checkbox_create(scr);
    lv_checkbox_set_text(cb, "Checkbox");
    lv_obj_set_style_text_color(cb, COLOR_TEXT, 0);
    lv_obj_align(cb, LV_ALIGN_TOP_LEFT, col_right, start_y + 120);

    /* Bar */
    lv_obj_t * bar = lv_bar_create(scr);
    lv_obj_set_size(bar, 500, 20);
    lv_obj_align(bar, LV_ALIGN_TOP_MID, 0, start_y + 220);
    lv_bar_set_value(bar, 70, LV_ANIM_OFF);

    lv_obj_set_style_bg_color(bar, COLOR_WIDGET, LV_PART_MAIN);
    lv_obj_set_style_bg_color(bar, COLOR_ACCENT, LV_PART_INDICATOR);

    lv_obj_t * bar_label = lv_label_create(scr);
    lv_label_set_text(bar_label, "Bar");
    lv_obj_set_style_text_color(bar_label, COLOR_TEXT, 0);
    lv_obj_align_to(bar_label, bar, LV_ALIGN_OUT_TOP_MID, 0, -8);
}
Conclusion
In this guide we demonstrated how to run LVGL on a Riverdi EVE4 display using the Riverdi Evaluation Board as the host platform.
Instead of rendering a traditional framebuffer on the MCU, the system uses the EVE graphics engine to generate the final image. The host microcontroller sends drawing commands over SPI, while the BT817 GPU builds the Display List and renders the frame on the display.
This architecture allows complex graphical user interfaces to run on relatively small microcontrollers while keeping memory usage and CPU load low.
Once the display driver is correctly initialized, LVGL can be used to build full graphical applications in the same way as with other supported display drivers.
From this point, developers can begin building their own interfaces using LVGL widgets, layouts, and event handling mechanisms.
Further steps may include:
- Integrating custom screens and application logic
- Adding images and fonts stored in EVE RAM_G
- Optimizing SPI communication for higher rendering performance
To do that, find more on the LVGL documentation website and browse our Riverdi Github.
DISCOVER OUR
Whitepaper
Achieve the perfect user-display interaction with the right Touch Sensor IC. Ever faced issues with phantom touch events or certification? Boost your R&D like a pro with our Whitepaper!
Go to our product catalog and see how you can save by quality, not on quality.