
The goal of this guide is creating a running system from clean/fresh hardware – using Torizon OS and example device tree source files from Riverdi GitHub.
This way we achieve:
- Flash Torizon OS from scratch
- Build a custom Device Tree Overlay from Riverdi GitHub
- Enable overlay in Torizon
- Boot into a fully graphical display with touch
This guide intentionally avoids:
- Building Yocto from scratch
- Recompiling the Linux kernel
- Using a full Linux virtual machine
System architecture overview
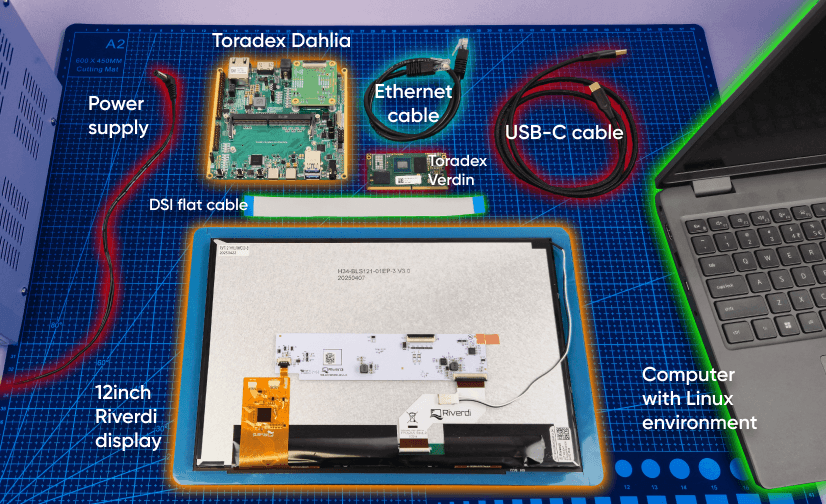
Hardware
- Toradex Verdin iMX8MP or iMX8MM
- Toradex Dahlia carrier
- Riverdi 12.1” display (or any other Riverdi display, but in this example we use 12.1”)
Before modifying the system, it is important to understand how the display pipeline is constructed on Verdin iMX8MP + Dahlia.
Display Data Path
For the Riverdi 12.1″ display, the signal chain is:
i.MX8MP LCDIF
↓
MIPI DSI
↓
SN65DSI83 (DSI → LVDS bridge)
↓
LVDS Panel
- The LCDIF block inside the i.MX8MP generates pixel data.
- The data is transmitted via MIPI DSI.
- The TI SN65DSI83 converts DSI to LVDS.
- The LVDS panel receives pixel data and displays the image.
Control Interfaces
Besides the video path, two additional subsystems must be configured:
- Backlight control
- Driven by PWM from the i.MX8MP
- Connected to the display backlight driver
- Duty cycle controls brightness (0–100%)
- Capacitive touch
- Connected via I2C
- Generates interrupt signals
- Exposes an input device in Linux (/dev/input/eventX)
Software
We used a Linux environment, in this example Windows virtual machine with Ubuntu installed there. This is the core of our guide. You will find here everything necessary – all the code we use, all the links and everything is explained. Please find our github below:
https://github.com/riverdi/riverdi-toradex-DTS
Installing build dependencies
Before building Device Tree overlays, the development environment must contain the tools required by the Linux kernel build system.
Open a terminal and install the required packages using the following
sudo apt install -y \
git make gcc g++ bc bison flex \
libssl-dev libncurses-dev \
python3 python3-pip rsync wget xz-utils \
device-tree-compiler
These packages provide the core utilities required to build kernel-related components and Device Tree artifacts.
The following tools are particularly important for the overlay build process:
- Git – Used to clone the Toradex kernel sources and the device-tree overlay framework.
- build tools (gcc, make, etc.) – Required by the Linux kernel build system.
- device-tree-compiler (dtc) – Compiles Device Tree source files (.dts) into binary Device Tree blobs (.dtb or .dtbo)
- Additional libraries such as libssl-dev and libncurses-dev are required by various parts of the kernel build infrastructure.
After the dependencies are installed, the system is ready to clone the Toradex kernel sources and prepare the build environment for Device Tree overlay compilation.
Creating swap space and preparing the working directory
When working in a virtual machine, the available RAM may be limited. Kernel-related build systems can require additional memory during compilation, especially when processing large source trees.
To avoid memory-related build failures, it is recommended to create a swap file that provides additional virtual memory.
Create a 4 GB swap file using the following commands:
sudo fallocate -l 4G /swapfile
sudo chmod 600 /swapfile
sudo mkswap /swapfile
sudo swapon /swapfile
The swap file is then added to the system configuration so it is automatically enabled after reboot:
echo '/swapfile none swap sw 0 0' | sudo tee -a /etc/fstab
After preparing the swap space, create a working directory that will store all repositories and build artifacts used in this guide:
mkdir -p ~/work
cd ~/work
This directory will be used as the main workspace for cloning the Toradex kernel sources, the overlay framework, and the Riverdi display overlay files.
Cloning the Toradex Linux kernel sources
The next step is to download the Toradex Linux kernel sources. These sources provide the build infrastructure and header files required by the Device Tree overlay compilation process.
Navigate to the working directory created earlier and clone the Toradex kernel repository:
git clone git://git.toradex.com/linux-toradex.git
This repository contains the Linux kernel used in Toradex BSP releases and includes the configuration files and build scripts required to compile kernel components and Device Tree overlays.
The kernel repository is relatively large, so cloning it may take several minutes depending on the network connection. In the accompanying video this step is accelerated to keep the tutorial concise.
After the repository is downloaded, the next step will be selecting the kernel branch that matches the BSP version used on the target Verdin module.
Selecting the correct kernel branch
After cloning the Toradex kernel repository, the next step is to select the branch that corresponds to the BSP version running on the target device.
Toradex BSP releases are built on specific Linux kernel versions, and Device Tree overlays must be compiled against the same kernel branch to ensure compatibility.
To list available kernel branches related to Linux 5.15, run:
git branch -a | grep -E "5\.15|toradex_5\.15" | head -n 50
This command filters the available branches and shows the ones related to the Linux 5.15 kernel series used by several Toradex BSP releases.
git checkout toradex_5.15-2.2.x-imx
This branch contains the kernel sources and configuration used by Toradex BSP versions based on Linux 5.15 for NXP i.MX processors.
Selecting the correct branch ensures that the Device Tree overlay will be built against a kernel tree that matches the software running on the target hardware.
Cloning the Device Tree overlay framework
The next step is to download the Toradex Device Tree overlay framework. This repository contains the build infrastructure used to compile Device Tree overlays using the Linux kernel build system.
Clone the repository into the working directory:
git clone git://git.toradex.com/device-tree-overlays.git
This repository provides the Makefile structure and integration required to build .dtbo files using the kernel sources cloned earlier.
Once the repository is cloned, a new directory named device-tree-overlays will appear in the workspace. This directory will be used later to add the Riverdi overlay sources and compile the final overlay.
Selecting the correct overlay framework branch
After cloning the device-tree-overlays repository, the next step is to select the branch that corresponds to the same kernel version used earlier.
The Device Tree overlay framework must match the kernel branch used in the linux-toradex repository. This ensures that the overlay build process uses the correct kernel headers and build configuration.
First, list the available branches related to the Linux 5.15 kernel series:
git branch -a | grep -E "5\.15|toradex_5\.15" | head -n 50
This command filters the available branches and displays those associated with the Linux 5.15 kernel used by several Toradex BSP releases.
Next, check out the branch corresponding to the kernel version selected earlier:
git checkout toradex_5.15-2.2.x-imx
Using the same branch for both the kernel sources and the overlay framework ensures that the build system remains compatible with the BSP running on the target Verdin module.
Configuring the kernel source path and cloning the Riverdi overlay sources
Before building Device Tree overlays, the overlay build system must know where the Linux kernel sources are located. This is done by defining the STAGING_KERNEL_DIR environment variable, which points to the previously cloned linux-toradex repository.
Set the variable using the following command:
export STAGING_KERNEL_DIR=$HOME/work/linux-toradex
To make the configuration persistent across terminal sessions, add it to the shell configuration file:
echo 'export STAGING_KERNEL_DIR=$HOME/work/linux-toradex' >> ~/.bashrc
source ~/.bashrc
This variable allows the overlay build framework to access the kernel headers and build scripts required by the Linux kernel build system.
Cloning the Riverdi overlay sources
Once the kernel path is configured, the next step is to download the Riverdi overlay sources used in this guide.
Clone the repository into the working directory:
git clone https://github.com/riverdi/riverdi-toradex-DTS.git
This repository contains Device Tree overlay source files used to configure Riverdi displays with Toradex Verdin modules.
These overlay sources will be integrated into the Toradex overlay build framework in the next step of the guide.
Verifying repository branches and locating overlay sources
Before proceeding with the overlay build process, it is recommended to verify that both the linux-toradex repository and the device-tree-overlays framework are using the same kernel branch.
This ensures that the overlay build process remains compatible with the kernel sources used earlier.
You can verify the active branch in each repository using:
git rev-parse --abbrev-ref HEAD
Both repositories should report the same branch name, for example:
toradex_5.15-2.2.x-imx
Using the same branch in both repositories ensures that the Device Tree overlay framework uses the correct kernel headers and build configuration.
Next, navigate to the cloned Riverdi repository to locate the Device Tree overlay sources:
cd ~/work/riverdi-toradex-DTS
ls
This repository contains the Device Tree source files (.dts) and include files (.dtsi) used to configure Riverdi displays on Toradex Verdin platforms.
The required overlay files will be copied into the Toradex overlay build framework in the next step.
Building the overlay and preparing the kernel source tree
At this stage, the Riverdi overlay sources are present in the overlay build directory and the overlay has been added to the dtb-y list in the Makefile. The next step is to compile the overlay.
From the device-tree-overlays/overlays directory, start the build:
make clean
make
If the kernel source tree has not been prepared yet, the build can fail with an error similar to:
Kernel configuration is invalid
include/generated/autoconf.h or include/config/auto.conf are missing
This is expected because the Toradex overlay framework uses the Linux kernel build system (Kbuild). Kbuild requires a configured and prepared kernel tree to generate the required header files and configuration artifacts.
To resolve this, prepare the kernel source tree:
- Navigate to the kernel repository.
cd ~/work/linux-toradex - Configure the build for the Verdin iMX8M Plus platform. The SoC is 64-bit ARM, so use arm64 and an AArch64 cross-compiler.
export ARCH=arm64
export CROSS_COMPILE=aarch64-linux-gnu- - Install the cross-compiler toolchain on the host system:
sudo apt install -y gcc-aarch64-linux-gnu - Generate a default kernel configuration and prepare the kernel tree:
make defconfig
make oldconfig
make prepare
make scripts
These commands generate the missing configuration files and headers required by Kbuild, including include/config/auto.conf and include/generated/autoconf.h.
After the kernel tree is prepared, return to the overlay directory and run the overlay build again:
cd ~/work/device-tree-overlays/overlays
make clean
make
The overlay should now compile successfully and produce a .dtbo output file.
Adding the Riverdi overlay sources to the build framework
The Toradex overlay build framework compiles overlays located in the overlays directory. Therefore, the Riverdi Device Tree source files must be copied into this directory before the build process can begin.
Navigate to the overlay build directory:
cd ~/work/device-tree-overlays/overlays
Copy the Riverdi overlay source file for the 12-inch DSI display:
cp ~/work/riverdi-toradex-DTS/verdin-imx8mp_panel-cap-touch-12inch-dsi_overlay.dts .
Next, copy the additional display include files used by the overlay:
cp ~/work/riverdi-toradex-DTS/display-*.dtsi
These .dtsi files contain panel-specific configuration data such as timing parameters and panel interface definitions used by the main overlay file.
Registering the overlay in the build system
For the overlay to be compiled, it must be added to the Makefile used by the Toradex overlay framework.
Open the Makefile located in the overlays directory:
nano Makefile
Add a new entry to the dtb-y list:
cd ~/work/riverdi-toradex-DTS
dtb-y += verdin-imx8mp_panel-cap-touch-12inch-dsi_overlay.dtbo
This line instructs the kernel build system to compile the corresponding .dts file into a .dtbo binary during the build process.
Once this entry is added, the overlay becomes part of the build targets and will be generated when the overlay build command is executed.
Building the Device Tree overlay
After preparing the kernel source tree, the overlay can be compiled successfully.
Return to the overlay build directory:
cd ~/work/device-tree-overlays/overlays
Clean any previous build artifacts:
make clean
Then start the overlay build:
make
During the build process, the Linux kernel build system invokes the Device Tree Compiler (dtc) and compiles the registered overlay source file into a binary .dtbo file.
If the build completes successfully, the build output will include:
DTC verdin-imx8mp_panel-cap-touch-12inch-dsi_overlay.dtbo
This indicates that the Device Tree source file has been successfully compiled.
The generated .dtbo file will appear in the same overlays directory and is now ready to be transferred to the target Toradex Verdin module.
Deploying
Connecting to the Verdin module
After successfully building the Device Tree overlay on the host system, the next step is to deploy it to the Toradex Verdin module.
To access the module’s Linux console, connect to the device using a serial terminal. In this example, PuTTY is used to establish the connection.
Configure the serial connection with the following parameters:
- Connection type: Serial
- Serial line: The COM port assigned to the Verdin debug UART – check it in device manager
- Speed: 115200
After opening the connection, the terminal will display the boot log and eventually provide access to the Linux shell running on the Verdin module.
This console will be used to transfer the compiled .dtbo file and enable the overlay in the boot configuration.
Configuring the network interface on the Verdin module
Before transferring the compiled overlay file to the target device, the Verdin module must have network connectivity with the development host.
First, check the available network interfaces and their current configuration:
ip a
This command displays all network interfaces present on the system and their current status.
Next, assign a static IP address to the Ethernet interface:
ip addr add 192.168.10.2/24 dev eth0
Then enable the interface:
ip link set eth0 up
With the interface configured, the Verdin module can communicate with the host machine over the local network. This connection will be used in the next step to transfer the compiled .dtbo file.
Configuring a static IP address on the host computer
To enable communication between the development host and the Verdin module, both devices must be located in the same network subnet.
After assigning the address 192.168.10.2 to the Verdin module, configure the Ethernet interface on the host computer with a static IP address.
On Windows, open Advanced network settings, then navigate to the properties of the Ethernet adapter and configure the IPv4 settings manually.
Set the following parameters: (you can set different, but we just recommend these)
- IP address: 192.168.10.1
- Subnet mask: 255.255.255.0
- Default gateway: leave empty
This configuration places both devices in the same local network:
- Host computer → 192.168.10.1
- Verdin module → 192.168.10.2
With this setup in place, the two systems can communicate directly over Ethernet and the compiled .dtbo file can be transferred to the Verdin module in the next step.
Transferring the overlay to the Verdin module
Once the host computer and the Verdin module are connected through the network, the compiled Device Tree overlay can be transferred to the target device.
In this example, the file is copied using scp (Secure Copy Protocol):
scp ~/work/device-tree-overlays/overlays/verdin-imx8mp_panel-cap-touch-12inch-dsi_overlay.dtbo \
[email protected]:/boot/overlays/
This command copies the compiled .dtbo file from the development host to the /boot/overlays directory on the Verdin module.
During the first SSH connection, the host system may display a security prompt asking to confirm the authenticity of the target device. After accepting the fingerprint, the file transfer proceeds normally.
The /boot/overlays directory is used by the Toradex boot configuration to store Device Tree overlay binaries that can be loaded during system startup.
Summary
Make sure the overlay matches the exact BSP and kernel branch used on your target device – this is where most build issues come from. Once the environment is set up correctly, the workflow becomes repeatable: compile, deploy, enable, and test. From there, adapting overlays for other Riverdi displays is mostly a matter of adjusting panel-specific files.
DISCOVER OUR
Whitepaper
Achieve the perfect user-display interaction with the right Touch Sensor IC. Ever faced issues with phantom touch events or certification? Boost your R&D like a pro with our Whitepaper!
Go to our product catalog and see how you can save by quality, not on quality.