Can one embedded display drive another at the same time?
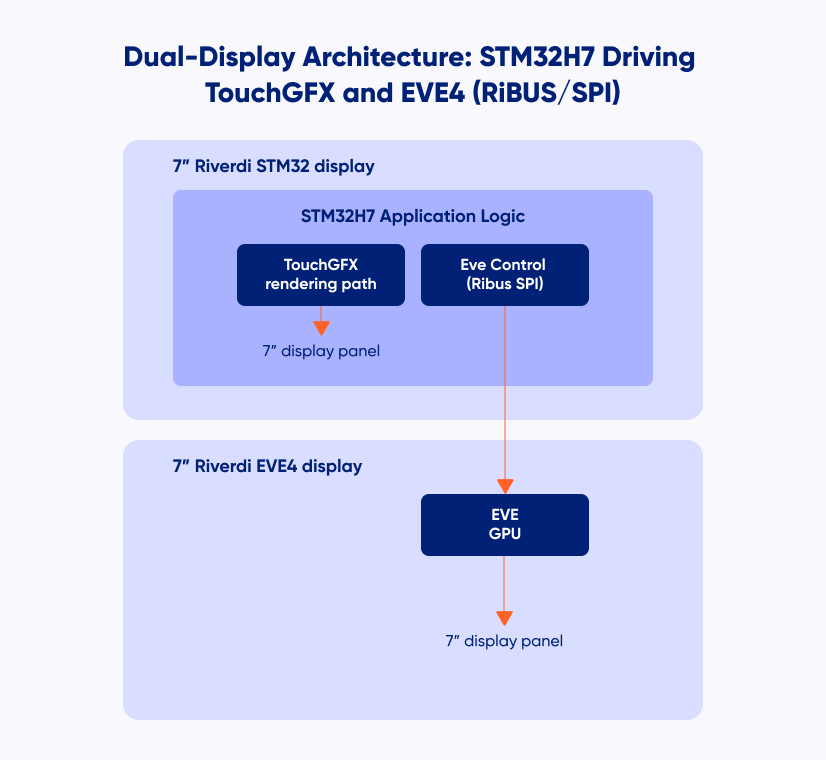
In this guide, we show how a single STM32H7 integrated into a Riverdi display can simultaneously:
- render its own GUI using TouchGFX, and
- control a second EVE4-based display over RiBUS (SPI).
The result is a clean and repeatable template for dual-display systems such as POS terminals, kiosks, and industrial HMI panels.
The example is intentionally minimal. It focuses on:
- correct initialization order,
- clear separation of responsibilities,
- a shared application state used by two independent rendering paths.
The structure is designed as a practical foundation that can be extended step by step in real projects.
Hardware overview
Programming and debug
- ST-LINK/V3 connected via SWD to the STM32H7 integrated on the Riverdi display
- Only the STM32H7 is programmed
- The EVE4 display is never flashed and communicates exclusively over SPI
(RiBUS)
STM32 + EVE4 – Blog
Displays
Riverdi STM32 Embedded Display (master)
7” display with integrated STM32H7, driven by TouchGFX.
Riverdi EVE4 Display (slave)
7” EVE4-based display, controlled by STM32H7 over RiBUS.
Interfaces
- SWD – programming and debug
- SPI (RiBUS) – STM32H7 → EVE4 command interface
- Touch interfaces on both displays
Software stack
Development
- STM32CubeIDE
- STM32 HAL
- FreeRTOS
Graphics and UI
- TouchGFX – framebuffer-based GUI on the STM32H7-integrated display
- EVE4 (BT81x) – command-based rendering via Display Lists over SPI
Application layer
- Single application logic on STM32H7
- Separate execution contexts (FreeRTOS tasks)
- Shared application state used to synchronize both displays
Architecture concept—one logic, two renderers
The key architectural principle is separation of logic and rendering.
- STM32H7 owns the application state
- TouchGFX and EVE4 are independent rendering backends
- Both displays react to the same shared state
Rendering models
TouchGFX
- Framebuffer-based rendering
- Fully handled by the STM32H7
EVE4
- Command-based rendering using Display Lists
- Rendering executed by the EVE GPU
The goal is not to compare these approaches, but to show that both can coexist cleanly in a single system driven by one microcontroller.
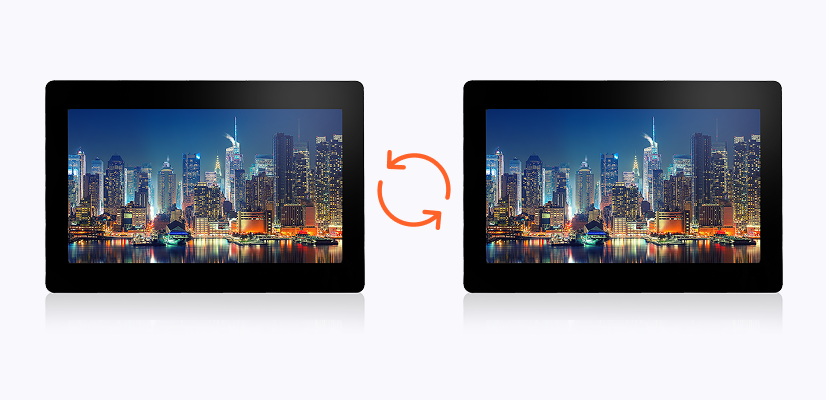
Demo scenario—shared state and bidirectional interaction
The example demonstrates a small shared application state exchanged between two independent UIs.
- The TouchGFX display (master) proposes changes.
- The EVE4 display (slave) confirms or rejects them.
Touch interaction on one display directly affects the behavior of the other.
Shared application state
typedef struct {

uint8_t master_proposedColor;
uint8_t master_requestPending;
uint8_t slave_currentColor;
uint8_t slave_lastResponse;
uint8_t slave_responseDirty;

} app_state_t;

volatile app_state_t gAppState = {

.master_proposedColor = COLOR_RED,
.master_requestPending = 0,
.slave_currentColor = COLOR_RED,
.slave_lastResponse = SLAVE_IDLE,
.slave_responseDirty = 0

};
The state is initialized deterministically so both displays start synchronized.
From that point:
- TouchGFX updates master_proposedColor and sets master_requestPending.
- EVE4 accepts or rejects and updates slave_currentColor and slave_lastResponse.
Both rendering paths continuously read gAppState and update their UI accordingly.
This keeps the interaction flow explicit, easy to follow, and fully driven by shared
application logic rather than direct display-to-display communication.
This interaction model is intentionally simple and serves as a clear template for real
projects where two displays need to cooperate while remaining architecturally independent.
Initialization order
Only the correct sequence is shown here.
- MCU initialization and clocks
HAL_Init() → SystemClock_Config() → PeriphCommonClock_Config() - Peripheral initialization
GPIO, LTDC/DSI, DMA2D/MDMA, SPI, timers, external memory (SDRAM/QSPI) - TouchGFX initialization
MX_TouchGFX_Init() → MX_TouchGFX_PreOSInit() - SPI initialization for RiBUS
MX_SPI1_Init() (or selected instance) - EVE4 initialization
EVE4_RiBUS_Init(&eve)
EVE4_RiBUS_ConfigIPS70(&eve) - Start FreeRTOS
osKernelInitialize() → MX_FREERTOS_Init() → osKernelStart()
Following this sequence avoids subtle startup issues and ensures that both rendering paths are initialized cleanly. TouchGFX starts with a fully configured display pipeline, and the EVE4 is ready to render as soon as its FreeRTOS task begins execution.
Project structure
This project keeps the TouchGFX UI and the EVE4 integration clearly separated.
- CM7/Core/
MCU startup and peripheral initialization (main.c, *_init.c)
system configuration and board bring-up - CM7/TouchGFX/
TouchGFX application (screens, widgets, assets)
main UI logic (master display)
- Application/User/Core/
app_state.c / app_state.h – shared master/slave application state (gAppState)
eve4_ribus.c / eve4_ribus.h – low-level EVE4 driver (SPI + register access + display list helpers)
eve_task.c – EVE FreeRTOS task (render loop + touch handling on the slave display) - Application/User/gui/ (TouchGFX user layer)
e.g. Screen1View.cpp/.hpp – master UI logic (propose color, reflect slave state)
Runtime model (TouchGFX + EVE task)
The application runs under FreeRTOS and uses two independent execution contexts:
TouchGFX task (master display)
Handles the main UI rendering and touch interaction on the STM32-driven display.
User actions update the shared state (gAppState).
EVE task (slave display)
Builds and swaps EVE display lists and processes touch input on the EVE4 display. Decisions (accept/reject) update gAppState and are reflected back on the master UI. Both rendering paths react to the same shared application state, keeping the architecture simple and the responsibilities clearly separated.
EVE rendering recap
The EVE4 display is updated using a standard display list sequence executed by
the EVE GPU:
CLEAR_COLOR_RGB() – set background color
CLEAR() – clear the drawing buffers
drawing commands
DISPLAY() – terminate the display list
Flush_DL_Buffer() – copy commands to RAM_DL
DLSWAP_FRAME – make the new frame visible
This low-level rendering flow is intentionally kept simple and unchanged, providing
full control over how and when the EVE4 updates its display.
Result
With this setup:
- both displays run simultaneously,
- both displays react to touch input,
- user interaction on one screen is reflected on the other.
The result is a clean and scalable dual-display architecture driven by a single STM32H7, where one application controls two independent rendering paths with clearly separated responsibilities.
Summary and next steps
This template provides a starting point for systems requiring two displays driven by one microcontroller, using different rendering models but a shared application logic.
It can be extended naturally:
- expand the shared state,
- introduce advanced EVE graphics features,
- adapt the interaction model to more complex workflows,
- migrate to newer EVE generations.
The complete reference project is available on GitHub:
https://github.com/riverdi/STM32H7-EVE4
This project is designed as a practical foundation for scalable dual-display systems based on STM32 and EVE.
DISCOVER OUR
Whitepaper
Achieve the perfect user-display interaction with the right Touch Sensor IC. Ever faced issues with phantom touch events or certification? Boost your R&D like a pro with our Whitepaper!
Go to our product catalog and see how you can save by quality, not on quality.