Riverdi EVE5 is our Embedded Video Engine platform for large, high-resolution displays, built on Bridgetek’s BT82x family.
This introduction focuses on the practical first steps when starting an EVE5 project: confirming hardware bring-up using a minimal C example, rapidly prototyping a user interface with the EVE Screen Editor, and reviewing the official Bridgetek ecosystem, including GitHub examples and development tools.
Specifically, this guide covers:
- A quick hardware overview
- Creating a screen in the EVE Screen Editor
- Running the official C example from Bridgetek’s GitHub repository
Whether you are transitioning from EVE4 or starting with EVE5 for the first time, this workflow provides a complete and reliable foundation for further development.
Note: The BT820B supports resolutions up to 1920×1200. Riverdi’s standard EVE5 product offering is based on a 15.6″ Full HD panel with a resolution of 1920×1080.
Where EVE5 fits in the Riverdi portfolio
EVE4 and EVE5 are not “better vs. worse” products. They address different display size classes:
- EVE4 displays: up to 12.1″
- EVE5 displays (Riverdi offering): 15.6″ Full HD (1920×1080)
For projects that require a large Full HD panel, EVE5 is the platform designed for this display class.
Hardware setup
To follow the workflow shown in the video, the following hardware is used:
- Riverdi 15.6″ EVE5 Full HD display
- Riverdi Evaluation Board
- RiBUS flat cable
- Power supply
- ST-LINK debugger/programmer
- Micro USB cable (Evaluation Board to PC)
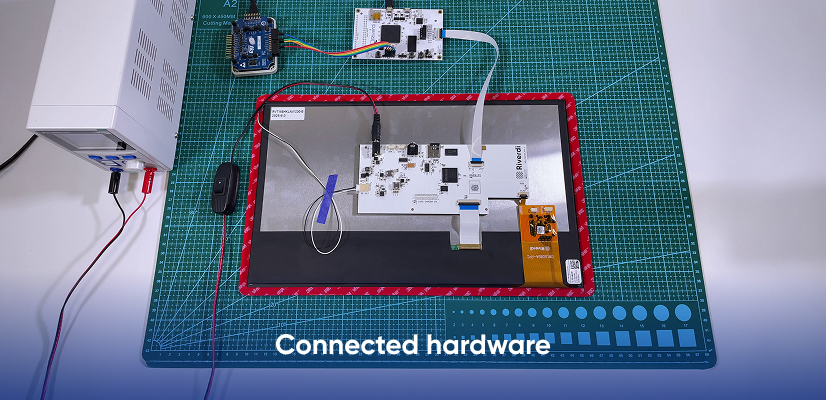
RiBUS simplifies the connection by combining power, SPI communication, touch interrupt, and backlight control in a single flat cable.
The Riverdi Evaluation Board serves two different roles, depending on the current development stage.
Connection steps (high-level)
- Connect the RiBUS cable between the display and the Evaluation Board.
- Connect power to the display and setup, according to your evaluation configuration.
- Connect the Evaluation Board to the PC using the Micro USB cable.
Two development modes: ST-LINK vs EVE Screen Editor
C code development (with STM32CubeIDE)
When developing in C using STM32CubeIDE, the STM32 microcontroller on the Evaluation Board runs the application firmware.
In this mode:
- the firmware is programmed using ST-LINK,
- the MCU initializes the EVE5 display,
- the application controls the graphics output (for example, loading and displaying an image from an SD card).
This is the standard workflow for firmware-based projects. It confirms that display initialization, communication, and the graphics pipeline are working correctly.
UI prototyping with EVE Screen Editor
When using the EVE Screen Editor, no MCU firmware is required.
In this mode:
- the Riverdi Evaluation Board acts as a serial communication bridge between the PC and the EVE device,
- the Screen Editor communicates directly with the EVE controller,
- Display Lists are written directly to EVE memory.
As a result, ST-LINK is not used during EVE Screen Editor operation. The user interface is created and programmed directly from the PC.
This clear separation makes it possible to prototype and validate user interfaces without writing, compiling, or flashing application code.
Quick UI prototyping with EVE Screen Editor (ESE)
Once the display is confirmed working, the fastest way to iterate on UI concepts is the EVE Screen Editor.
Why use ESE?
- Fast UI prototyping without writing application code,
- clear visualization of what will be rendered from the Display List,
- instant iteration: change → program → see result on real hardware.
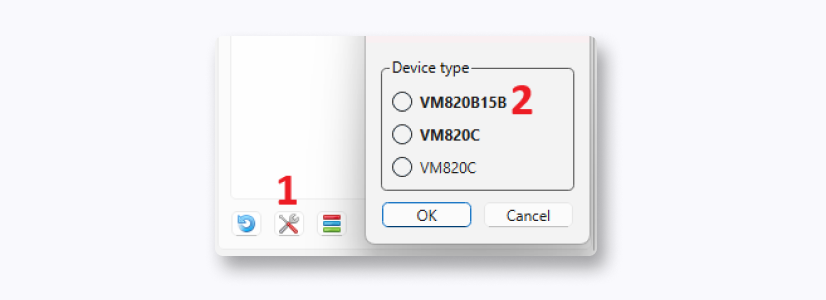
ESE workflow shown in the video
- Open EVE Screen Editor and browse the built-in examples.
- Select a gradient example as a clean starting point.
- Confirm that the board is detected (for example, listed as a Single RS232-HS device).
- Select the Riverdi preset: VM820B15B.

- Connect to the device and program it.
- From the toolbox (typically on the left), add a widget:
Widgets → Spinner
Adjust its parameters either in the widget properties or directly in the Display List:- style = 3
- scale = 1
- Program the device again to observe how quickly the display updates.
The key concept is that ESE automatically generates the Display List, which is then executed directly by the EVE device. This allows layout and visual design to be validated on real hardware within seconds.
Bridgetek GitHub examples as a project base
For firmware development beyond the initial bring-up stage, Bridgetek provides official reference code on GitHub:
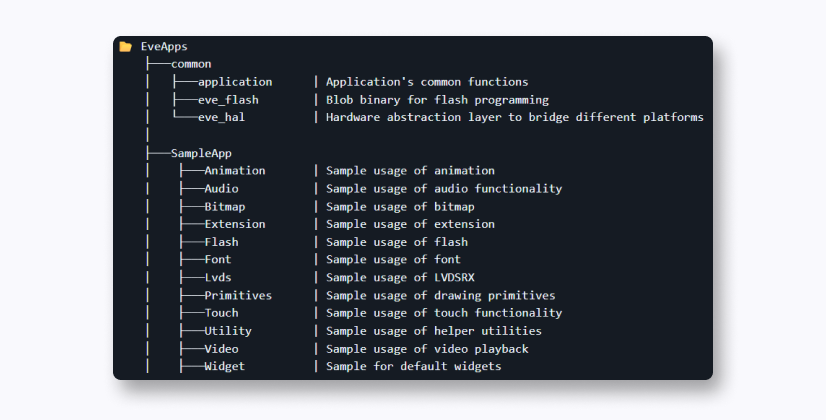
These examples are a solid starting point, as they demonstrate proven patterns for Display Lists, asset handling, widgets, and typical rendering flows.
A practical development workflow is as follows:
- start with an existing example (bitmap-based demos are often the simplest entry point),
- adapt the display initialization parameters to match your specific panel,
- build your application incrementally on top of the reference code.
Using the official Bridgetek examples helps reduce uncertainty during early development and provides a stable foundation for more advanced EVE5-based applications.
DISCOVER OUR
Whitepaper
Achieve the perfect user-display interaction with the right Touch Sensor IC. Ever faced issues with phantom touch events or certification? Boost your R&D like a pro with our Whitepaper!
Go to our product catalog and see how you can save by quality, not on quality.